Pages

Showing posts with label swimming. Show all posts

Friday, July 29, 2011

6 Steps to a Smooth Swim Exit

By Jené Shaw

Triathlete.com

Exiting the open water is an often overlooked part of the transition from swim to bike. Many seconds can be gained and lost, so technique and planning are important.

Sara McLarty thinks about the swim exit in six steps:
Step 1: Swim toward the finish. Know the course and find tall buildings or trees to sight that are in line with the swim exit.
Step 2: Activate your legs. Kick a little extra during the last 200 meters of the swim.
Step 3: Keep swimming! Don't stop or stand up until you have run aground in the shallow water. When your fingers scrape the bottom, take a few more strokes by pulling right under your torso.
Step 4: Stand up and lift your goggles onto your forehead. This action clears your vision as you start to run out of the water.
Step 5: Unzip your wetsuit on solid ground. Running through sand and rocks is hard enough. Wait until you reach carpeting or pavement to search for that strap!
Step 6: Take off your cap and goggles when you see your bike. Abandonment of equipment can result in a penalty, so don't risk dropping these small items.

Saturday, May 7, 2011

Workout of the Month: Key Swims

 by Marilyn McDonald
from endurancecorner.com


Late last month I was spoke with Bevan and John at IMTalk about my thoughts on swimming, my experience and my personal position on swimming. You can listen to that pod cast at IMTalk.me.
Here are the three key swims I think you need per week as we head into the race season.

Long Aerobic Strength
Count your stroke count and time your distance and effort. Do the same stroke count and time for each.

Choose any one of the following sessions. Always include a warm up and cool down.
  • 10x 400 swim on 10 seconds rest.
  • 6x 800 pull with band and buoy.
  • 3-4x 1000 pull with small paddles.
  • 3x 1500m.
  • 1 hour continuous swim open water in wet suit with paddles.
Race Test Set
  • 30x 100 on 40 seconds rest. Best possible time for all. Stroke rate and pace at or slightly above race intensity.
  • 12 x 200m at race pace on 15 seconds rest. Maintain same time for all.
Speed Set
  • Warm up well with 1000-1500 of mixed swimming.
    20x 25m max effort on equal or greater rest.
    5x 100 on race pace on 5 seconds rest
    Repeat both steps 1-4 times through.
    25s can be max swim or max turn over band only swimming.

  • Warm up well with 1000-1500 of mixed swimming.
    4-6x 50m max effort on 20-40 seconds rest.
    8x 100 on race pace with 10 seconds rest.
    Repeat 2-4 times through.
If you have more than three days of sessions in your weeks program and you have more time to swim I recommended one easy technique focused session and on 3-4k session where you do a 2k main set of steady swimming on short rest.

Be fit on the swim -- it effects your entire day! What you do in the water directly impacts your bike and impacts your run. Triathlon is a start line and a finish line, it pays to be ready in the water!

Thursday, May 5, 2011

Swim Fast to Get Fast: The 50s

By Gale Bernhardt
For Active.com


In an earlier column, I encouraged you to try some fast 25s to boost your swimming speed.

I've received some posts on the community board and in a few e-mails that people have been trying the workouts and, lo and behold, they are swimming faster. Excellent!

Now that you've mastered some of the shorter workouts, let's bump the distance up some. Below are new workouts for you to try:

Workout No. 1

Complete a mixed warm-up totaling 500 to 1,000 yards/meters.
After the warm-up, go through the following set two or three times:
  • 2 x 25 — Build speed throughout each 25
  • 2 x 25 — Swim half the distance as fast as you can, it doesn't matter if it is first half or last half. Swim the "other half" easy.
  • 1 x 50 — All-out fast
  • 1 x 50 — Easy
Make your swim interval something that gives you 5 to 10 seconds rest on the 25s, about 20 seconds of rest on the 50-all-out-fast and about 90 seconds on the 50 easy.
After the speedy set, head into your main set. The main set can include swims in the 100 to 300 range.

Workout No. 2

Complete a mixed warm-up totaling 500 to 1,000.
After the warm-up, go through the following set two to four times:
  • 4 x 25 — Build speed throughout each 25 (Make the swim interval something that gives you about 10 seconds of rest.)
  • 1 x 50 — All-out fast (Make the swim interval something that gives you about 20 seconds of rest.)
  • 1 x 25 — Easy (Make the swim interval something that gives you 15 to 20 seconds of rest.)
  • 1 x 25 — All-out fast (Make the swim interval something that gives you about 10 seconds of rest.)
After the speedy set, head into your main set. The main set can include swims in the 100 to 300 range.

Optional Main Set

An optional main set to include after Workout No. 1 or 2 follows:
  • 3 x 100 on a swim interval that gives you 10 to 15 seconds of rest. Swim all of these at a steady pace.
  • 3 x 100 on a swim interval that gives you 15 to 20 seconds rest. Negative-split each 100.
  • 3 x 100 on a swim interval that gives you 20 to 30 seconds rest. Swim these so that each 100 is faster than the previous one. The last one is a fast one.
If you have the time and fitness, go through the set of 100s twice.

Workout No. 3

Complete a mixed warm-up totaling 500 to 1,000.
After the warm-up, do 4 x 25 building speed throughout each 25 (Make the swim interval something that gives you about 10 seconds of rest.)
Take one minute of rest, then do:
  • 6 x 50 — All-out fast. No holding back. Expect the fastest one to be the second or third one. It's okay if speed fades some, just swim fast. Make the swim interval something that gives you 80 to 100 seconds of rest between each 50 swim.
After the speedy set, head into your main set. Keep it primarily aerobic. If you swim really, really fast (like the instructions tell you to do) you won't have much high-end speed for the rest of the workout.
The biggest mistake you can make in the workouts above is to try to be a Sammie Save-up. Of course there are times when you should be holding some speed in reserve so you can negative-split a swim; but not in these workouts. Cut loose and see how fast you can go.


Gale Bernhardt was the 2003 USA Triathlon Pan American Games and 2004 USA Triathlon Olympic coach for both the men's and women's teams. Her first Olympic experience was as a personal cycling coach at the 2000 Sydney Olympic Games. Thousands of athletes have had successful training and racing experiences using Gale's pre-built, easy-to-follow training plans. For more information, click here. Let Gale and Active Trainer help you succeed.

Tuesday, May 3, 2011

Flexibility Training: Swimming Stretches

By Brian Dorfman
For Active.com 

I think of swimming as the savior for the triathlete. Swimming is the perfect compensator for biking and running.

In fact, the breathing, rhythm and extension in swimming are an invaluable counter movement or counter position to biking and running. If an athlete can't swim, they lose a lot more than just speed in the water.

Swimming will stretch tight quads from biking and strengthen the back for running. Yet it's the shoulder that's essential for swimming longevity. Use these stretches to take care of your shoulders and swim forever.

These stretches aid the shoulder girdle and the side of the torso, and will decrease compression, support range of motion and strengthen the torso. More specifically, we'll access the powerful pectorals (pects), versatile deltoids, valuable rotator cuff muscles, elastic latissimus dorsi (lats) and the underrated intercostal (rib) muscles.

You'll find that slight shoulder or hip rotation can modify the intensity of the stretch, or target a different area. Also, when you stay in a stretch, breathe deeply and compare the difference in the stretch at the top of the inhale versus the end of the exhale.

Front of the Shoulder Stretch: Pector Elongator

Maintaining open, fluid movement in the front of the shoulder during swimming will decrease compression in the joint. With biking and running, the shoulder tends to rotate inward and lift up toward the ear.

This same movement in swimming will add to tension and compression in the neck and shoulder.

The pector elongator is a great stretch to use before or after a workout.
  1. Stand with your right hip about two or three feet away from a wall.
  2. Place your right hand on the wall at shoulder level, behind the torso. Keep your elbow loosely bent.
  3. Now rotate your elbow forward and maintain this forward rotation throughout the stretch.
  4. Twist your upper torso to the left, while retaining elbow rotation, to create a stretch in the front of the right shoulder.
  5. Hold the stretch for five to 12 breaths.
  6. Switch arms and repeat.
Variations can be created by moving your hand up and down the wall or by stepping farther away from the wall. Pector elongator is intense, so go easy. When you start to feel the stretch, stop and inhale deeply into the area being stretched.


Also, using a doorway will give you a perfect stretch at home or at the office. The hard part of this stretch is continuing to maintain a forward rotation of the elbow.

Deltoid/Rotator Cuff Stretch

Every shoulder problem seems to have rotator cuff involvement. These muscles are unique because they function as a ligament at the joint, and a muscle in locomotion. Located above the rotators are the deltoids, which can be stretched along with the rotators.


Deltoid/Rotator Cuff Stretch
When an athlete has any type of shoulder problem, this is the first stretch I introduce. It's ideal because it takes care of the muscle, the joint capsule and the range of motion.
  1. Stand facing the wall, approximately a foot away.
  2. Draw your right arm across your body.
  3. Place the back of your right hand on the wall at shoulder level.
  4. Move your left shoulder toward your right hand as far as you can, then lean the right shoulder toward the wall.
  5. To create a slightly different stretch, place the front of your hand on the wall.
  6. Hold the stretch for five to 12 breaths.
  7. Switch arms and repeat.
There's room to be creative with this stretch. You can walk the hips away from the wall or experiment with your hand in different locations. To intensify the stretch, use the floor instead of the wall.

The key is to move the shoulder that's not being stretched down, and slowly lean the involved shoulder into the wall, floor or couch. (see step 4).

Side of the Torso Stretch: Lateral Bend


Lateral Bend
The side (lateral) muscles of the torso have a great deal of strength, power, endurance and elasticity. This natural elasticity adds power without increased mass.

This stretch will allow you to be more effective in the reaching part of your swim stroke and have more power on the recovery part.
  1. Stand with your feet hip-distance apart, knees slightly bent.
  2. Expand your chest, lift your ribs and raise both hands over your head.
  3. On exhale, pull your abdomen back and lean to the right.
  4. Hold this position and inhale into the ribs.
  5. As you exhale, pull abdomen back and lean to the left, hold, inhale into the ribs.
  6. Repeat this side-to-side motion to the right and left four to six times.
Move from one side to the other on an exhale, allowing for a deep inhale into the ribs. This will increase both extension and strength. Keep the chest slightly in front of the hips and rotate the top of the pelvic girdle back—this will elongate the lower-back muscles and stretch the lats.

Lateral bend is a great stretch to use after a hard workout because of its effect on the lower back.

To concentrate the effects of flexibility training, your breath should be long and smooth, and your mind should be focused on the area you want to effect. Easy, extended breathing like this will improve both performance and recovery. Race and train forever.

Sunday, December 19, 2010

Balance Your Blades: 3 Corrective Shoulder Exercises

By Matt Fitzgerald
Triathlete magazine

Any good orthopedist or physical therapist knows pain in one part of the body is often caused by dysfunction in another part of the body. The most common area of pain in swimmers is the shoulder rotator cuff.
Swimmer's shoulder is a form of bursitis that develops when a bursa, or fluid sack, located at the shoulder rotator cuff is repeatedly impinged during the swim stroke and becomes inflamed. Repetitive impingement may also cause tendonitis (inflammation) or tendinosis (tissue degeneration) in the tendons of the rotator cuff.
The primary cause of swimmer's shoulder is not the rotator cuff, however; it's the scapula. Commonly known as the shoulder blades, the left and right scapulae are strategically positioned as critical links between the spine and the shoulder rotator cuffs.

Essentially, the scapulae and the 17 muscles around them are the foundation of your shoulders and the base of every arm movement. A healthy shoulder blade must be both stable and mobile. Lack of adequate stability or mobility in the shoulder blade makes the rotator cuff susceptible to impingement during overhead arm movements such as those involved in the freestyle swim stroke.

Posture Problems

Healthy shoulder blades are a rarity in our society. The problem is the amount of time we spend sitting in front of computers and steering wheels. The hunched position we tend to assume in these situations leads to a more or less permanent forward rounding of the upper spine, called kyphosis.

This posture inhibits the ability of the scapula to tilt backward and create space for the rotator cuff in the shoulder joint when the arm is lifted overhead. As a result, the rotator cuff gets pinched, causing tissue damage.

It doesn't stop there. In the keyboard-typing and steering-wheel-grasping positions our shoulders are internally rotated and protracted (pushed forward) for long periods of time. This leads to laxity and weakness in the muscles that externally rotate and retract (pull back) the shoulders.

Eventually, these imbalances cause the shoulder blades to float away from the spine toward the shoulder sockets, a phenomenon known as scapular winging. A healthy shoulder blade is sucked up tight against the ribcage. If your shoulder blades are visibly poking out of your upper back when you stand with your arms at your sides, then you have scapular winging.

Swimming tends to exacerbate these issues further, while also hastening and intensifying their consequences. Swimming strengthens the shoulder's internal rotators and protractors at the expense of the muscles that move the shoulders in the opposite directions.

To improve your shoulder health and performance, it's necessary to counterbalance these effects with strengthening exercises for the muscles that externally rotate the arms at the shoulder socket and retract the shoulder blades. A little bit of corrective exercise for the shoulders goes a long way.

I recommend doing one set of each of the following three exercises twice per week as a preventive measure if you have never experienced swimmer's shoulder. Build to two sets of each exercise three times per week if you have had a shoulder injury.

(Thanks to Eric Cressey, M.S., C.S.C.S., a Boston-based strength and conditioning coach who works with endurance athletes including Dede Griesbauer, second at Ironman Brazil this year, for teaching me these exercises.)

Scapular Push-up

The scapular push-up strengthens the serratus anterior, a muscle that essentially holds the shoulder blade tight to the rib cage to prevent scapular winging. It's a crucial muscle for optimal shoulder stability.
Scapular Push-Up
Assume a standard push-up position. Keeping your elbows locked, retract the shoulder blades so your torso sinks a couple of inches toward the floor. Now protract your shoulder blades fully, so your upper back takes on a slightly hunched look. Return to the starting position, and repeat 10 to 12 times.
Scapular Push-Up

Behind-the-Neck Band Pull-Apart

This exercise strengthens the lower trapezius muscles, which are very important for adequate scapular upward rotation and overall shoulder health.
Stand with your arms extended straight overhead and grasp a short resistance band with your hands at shoulder width and palms facing forward. By pulling the shoulder blades back and down and flexing the elbows, lower the band to a position behind your neck. The band will stretch several inches as this action is performed.
Pull Apart
You'll feel the effort in the muscles at the base of your shoulder blades. Do not let your chin protrude forward; keep it tucked. Pause briefly with the band behind your neck and return to the starting position. Repeat 10 to 12 times.

Overhead External Shoulder Rotation

This exercise strengthens the shoulder external rotators, enhancing shoulder stability during the performance of overhead arm actions.
Stand with your right upper arm extended away from your body at shoulder level, your elbow bent 90 degrees and your shoulder rotated internally so your forearm is pointing toward the floor (in line with your body). Hold a small dumbbell (three to five pounds) in your right hand.
Shoulder Rotation
Rotate your shoulder externally 180 degrees, stopping when your right forearm is pointing toward the ceiling. Return to the starting position. Complete 10 repetitions and repeat the exercise with your left arm.

Active Expert Matt Fitzgerald is the author of several books on triathlon and running, including Brain Training for Runners, Runner's World Performance Nutrition for Runners (Rodale, 2005) and Triathlete Magazine's Essential Week-by-Week Training Guide (Warner, 2006).
All Photos by John Segesta/wahoomedia.com

Saturday, December 18, 2010

Weird Words That Will Make You Swim Faster

From TrainingPeaks

by Ben Greenfield
As you’ve probably realized, your IQ drops when you exercise, and nowhere is this more true than when you’re trying to swim faster. So while reading a treatise on the biomechanics of a proper swim stroke may be simple when you’re sitting at the kitchen table, once you’ve jumped in the water and are huffing and puffing, you can barely remember anything you read or learned.

This is where some weird words come in handy. I’ve created a few simple phrases that I can learn the meaning of when I’m outside the pool, then, then when I’m swimming, I can simply pull these phrases into my head without having to focus too much on big sentence and paragraph-based swimming cues.

So, without further ado, here are weird words that will make you swim faster!

Swim Faster #1 - Press Lung: Ideal buoyancy in the water is achieved when the lungs, your body’s natural life preservers, are pressed down towards the bottom of the pool. This is the foundation of downhill swimming and the position that allows for a more streamlined body. Think of your body as a teeter-totter, with the hips as the fulcrum. Pressing the lungs down brings the legs up, and vice versa. If the legs are down, they simply act as anchors, producing drag against the water that slows the rest of the body. Whether in the front or side swimming positions, always focus on pressing the lungs down towards the bottom of the pool. Once this becomes natural, you’ll conserve enormous amounts of energy and see massive increases in speed.
Swimming Tips

Swim Faster #2 - Brush Thumb: A proper and full stroke should bring the thumb to brush against the thigh at the end of the pull phase. Too many swimmers cut their pull short, for the simple reason that it makes swimming easier. I guarantee that if you practice a full pull phase, you will feel horrible during your first few swims and the muscles will be completely fatigued by the end of the swim. After practicing for a few weeks, however, your body will adapt and your speed will skyrocket. One of the keys is to achieve the thumb against thigh position by using the powerful lat muscles underneath the armpits, not the relatively weaker biceps and forearm.

Swim Faster #3Boil Feet: The feet should be “boiling”, just below the surface of the water. Feet that are submerged far below the surface are simply acting as drag-producing anchors, while feet that kick and splash above the surface are wasting too much time kicking in the air. We all know that the air produces no resistance, so this is wasted energy. Think about making tiny bubbles with the feet as you kick. While triathletes should not be wasting precious muscle glycogen stores in the legs during the swim portion of the race, a low-medium effort kick will be enough to keep those foot-anchors up.

Swim Faster #4 - Hide Head: If you are in a proper downhill swimming position, just a sliver of the head will show against the water. As you practice “Press Lung”, a natural consequence should be that the head “hides” below the water. If your head/torso unit is high, your feet will drop. Once again, buoyancy is a crucial key to efficient swimming.

Swim Faster #5 - Puppet Elbow: Imagine that your elbow is attached to a puppet string that is pulling it straight out of the water in the recovery phase of the stroke. A full elbow recovery is very important, especially in choppy, open-water swimming, where a partially submerged arm in the recovery phase will quickly tire you out because of increased drag.

Swim Faster #6Cigar Mouth: For a streamlined breathing pattern, attempt to take as little of the head as possible out of the water when breathing. The best way to think about this is “smoking a cigar” when you inhale, meaning, for you healthy, non-smoking triathletes, that the breath only comes from the outside corner of the mouth while the inside corner of the mouth is under the water. As you learn this breathing method, you may end up swallowing a bit of water, but long term practice will result in more efficient swimming.
Swimming image 

Swim Faster #7 - Raise Pinky: To achieve optimum pull against the water with the hand, while still maintaining a drag-free slice through the water, the pinky should be elevated higher than the rest of the fingers during the entire stroke phase. Every hand is different, so experiment with the outwardly turned angle of the hand until you find a position that gives you the most speed. One of the common mistakes I see when the pinky is elevated is a completely locked out elbow. Never completely straighten the arm when reaching towards the end of the pool because you’ll be able to grab less water to pull against.

Swim Faster #8 - Wall Reach: “Reach Over a Wall”, “Spear a Fish”, “Take a Cookie From the Jar” – there are many ways to describe how your hand should feel as it enters the water, but the general idea is that you are grabbing as big a handful of water as possible when initiating the pull phase of the stroke. If your elbow was correctly drawn out of the water, this will result in a more vertical entry of the hand/forearm unit. Remember, the forearm creates pull against the water in the same way as the hand, so make sure to use it by keeping the elbow slightly bent as you reach over the wall.


If you found these swimming faster tips and cues helpful, then be sure to check out Ben’s online triathlon training plans, at http://tinyurl.com/tpplans, where there’s even more practical tips just like this, along with videos and more! 

Thursday, December 16, 2010

Exercises to Prevent Swimmer's Shoulder

By Jen Adley
For Active.com 

 
Swimmer's shoulder is an inflammatory condition caused by the impingement of soft tissue between two bones that meet in the shoulder. Repetitive overhead arm motion of the freestyle stroke can cause this overuse injury, but there are ways to prevent it.

Strengthening shoulder and upper-back muscles and stretching shoulder, chest and neck muscles will help to prevent a swimming posture that is more susceptible to injury. The muscle imbalance and inflexibility that typically occurs in swimmers contributes greatly to impingement. The following exercises and stretches specifically address these areas.

Shoulder Stability
The external rotators of the rotator cuff muscles play a crucial role in shoulder stability. These muscles are also inherently weak and are often the cause of rotator cuff impingement. By strengthening this group you will have a more stable shoulder joint.
ShoulderRotatorExercises
Using a stretch cord or cable, hold your arm so your bicep is parallel to the ground and your elbow is bent at a 90 degree angle. Pull your hand forward until your forearm is parallel with your bicep, making sure not to move your elbow.
You can also do this with a dumbbell, resting your elbow on a bent knee and rotating your forearm up and down at a 90 degree angle.

Balancing Out
This exercise promotes stability in the scapular region and prevents muscle imbalance associated with swimming. These muscles promote postural alignment and aid in shoulder stability. In swimmers they often become lengthened.
Lie face down on an exercise ball. Holding a barbell with both hands, raise it until your arms are outstretched in front of you. Remember to keep your back straight.

Building a Neutral Shoulder
This exercise strengthens the rear deltoid and mid-back. Swimmers often have shortened pectorals and front deltoids, causing a shoulder joint that internally rotates. By strengthening the muscles of the back and rear deltoid you maintain a more neutral shoulder.
Leaning face-forward on an incline, hold a dumbbell in each hand and raise them up past your body. Keep your arms straight.


Flexibility Options
These stretches address tightness and shortening in the shoulder, chest and back that arises from swimming. A tight shoulder capsule will prevent proper reach and form in the water. Hold each stretch for about 30 seconds. You may progressively increase the stretch slightly every 10 seconds (within the 30 seconds).
ShoulderExercisesStretches ShoulderStretche2

Swimmer's shoulder may primarily be prevented by using proper freestyle stroke. The hand should enter the water with the tips of the fingers first and the palm facing downward. When the hand enters the water it should not cross the middle of the body. For further stroke instruction, seek the advice of an experienced swimming coach.

Jen Adley earned her BS in Biology and a Masters degree in Physical Therapy. She is a practicing board certified physical therapist for Body Pros Physical Therapy and is coaches athletes for The Sport Factory. She is licensed by USA Triathlon and USA swimming with over 10 years coaching experience. Jen has three times received an honorable mention ranking from USA Triathlon. Visit www.thesportfactory.com to learn more about Jen or email her at coachjen@sportfactory.com.

Wednesday, December 15, 2010

Swim Drills vs. Swim Volume

by Mike Ricci
For Active.com
 
Lately there's been a lot of fuss over swim drills. People have been saying that swim drills are the hot new thing on the market. New? They've been around for decades. When I was coaching high school swimming in 1989, we were doing drills daily. Every workout had a drill set in it, even if it was only a 500-yard, weak-side breathing swim.

Swim gloves for fist drills? These gadgets are unnecessary. Get a tennis ball, hold it in your hand and start swimming--now that's a real fist drill. I've coached athletes who've started from scratch and those with college swim backgrounds; both practice swim drills. Swim drills are important and I practice drills three out of every four times I get in the water, just to refine my stroke. I've been doing this for years.

When volume makes more sense than drills

Here's the problem: Unless you have someone watching you, to keep an eye on form, the drills can do more harm than good. Swim drills are helpful, but there's a point of diminishing returns. In my opinion, there's a point or pace where swim volume might make a lot more sense than drills.

So what is that point? Some coaches would tell you that it's about 1:50 per 100-meter pace, and I would agree for the most part. That would give you around 1:10 for an Ironman-length swim, 35:00 for a half IM, or 26:00 for an Olympic-distance race. If you're slower than that, you should focus more on swim drills.

There's no doubt that drills have their place, but if you want to get faster you need to swim more. More than you're currently doing and more than you think you should. I spent an entire winter swimming more than I ever have. I had a few of my experienced Ironman athletes do the same thing. We all became better swimmers.

Could we have accomplished this by swimming drills day after day? No way.

How do I know? We tried that and it didn't work. Like I said above, UNLESS you have a qualified swim coach (someone with swim coaching experience -- not someone who read a how-to book on swimming, like your cousin Dwight) watch you do the drills, then you don't know if you're doing them correctly.

If you have someone standing over you with a video camera recording your workouts and you then analyze your technique after each workout, then sure, it'll work to a point. But the fact is, most people don't do the drills correctly.

The more you swim, the better you get

Which brings us back to volume: The more you swim, the more adaptive you become and the better your feel of the water becomes. It's just like riding your bike downhill; you learn how to lean into a turn, how to accelerate out of turn, etc.

Swimming is the same way. The more your hand enters the water and you get your forearm over the barrel, the better you'll know what it feels like to 'grab' water and pull yourself through it. The more times you get in the water, the more natural it becomes.

Take two swimmers of the same ability and have one swim a volume approach and the other swim one drill after another; the volume-based swimmer will win the race in the long run.

Next time you swim ...

Tips for increasing your swim volume:
  • Swim sets steady, not fast. This means swimming with a good clean stroke, without rushing.
  • More swim volume equals more aerobic base. This means you have more fitness.
  • The more fit you are as a swimmer, the better you'll feel on the bike and run.
  • A 1,500-meter race will seem like nothing compared to that big swim set you did.
  • More swim strokes means more times to look at your stroke and see what you're doing wrong/right.
  • Think about your stroke on every entry, catch, pull and finish.
  • Do your drills in the middle of your 4,000-yard workout, don't make them your entire 1,500-yard workout.
  • Do your volume swimming in the winter when you can't bike as much OR when you're injured.
  • Injury problems: Too much swim volume can lead to shoulder/back issues, so be careful!
  • If you want to get to the front of your age group, you need to get out of the water in the front.
Essential drills to do every time you're in the water:
  1. Fist drill - swim four strokes closed fist, four strokes open palm
  2. One-arm drill - literally, watch your catch and pull while swimming with one arm.
  3. Heads up swim, underwater recovery, AKA doggie paddle - Focus on the catch, nothing more.
  4. Swim golf - More of a swim set to figure out your optimal strokes per length. Swim 50 yards (two lengths) and count your strokes and your time. Add the two together and you have your golf 'score.' If it takes you 50 strokes and the swim took you 50 seconds, then your score is 100. The lower your score, the more efficient you're becoming.
  5. However, BEWARE, once you start learning how to manipulate the golf score you could end up digressing. I see swimmers all the time who try to swim 28 strokes, and have a swim time of 50 seconds (78 golf score). They'd be much better off swimming 34 strokes, with a 44 second swim (78 gold score). Personally, I'd give up strokes for speed on most days. Yes, I'm swimming more strokes, but don't I want to get there faster? Isn't that the point?
So, if you want to improve your swimming (and who doesn't?) and you can swim 1,500 meters faster than 26:00, then consider swimming more volume. You can focus on drills every time you swim, but if you really want to swim fast, you need to improve your endurance, and the only way to do that is to swim more. More than you think you should, and more than you think you can.


Mike Ricci, D3 Multisport head coach and USA Triathlon Level III Certified Coach, was selected to write the training programs for both the short and long course USA World Championship Teams from 2002-2005. D3 Multisport has a variety of services ranging from one-on-one coaching to training plans for specific events and races. Visit www.D3Multisport.com for more information or e-mail Mike at mike@d3multisport.com.

Monday, December 13, 2010

Perfect Practice Makes Perfect: Overhaul Your Swim Technique This Winter

This week we're going to focus on swimming!  Yeah!!!

By Steve Tarpinian
Triathlete magazine
from active.com

The offseason is the best time to overhaul your swimming technique, but the challenge, particularly this time of year, is that drills and yardage without focus or with less-than-perfect technique are barely worth the effort and yield minimal results.

To refine your freestyle for the coming season, select a three-month period during your offseason downtime—ideally a block well out from a scheduled A-priority race—in which you can focus on tweaking technique rather than on big volume and high intensity.

Before starting your three-month swim-technique block (which will be broken down below into three, four-week microcycles), get a video of yourself in the pool to establish a baseline. This will also help you determine which aspects of your technique require greater attention.

For example, if upon analyzing your swim video you see you have a good body position but a short, ineffective pull, you may decide to rework the below schedule to spend more time on those areas in which you're relatively weak. Additionally, videotape your freestyle stroke after each of the following four-week blocks to monitor improvement.

Finally, performing a 500-meter/yard time trial once per month will also help you gauge your improvement.

Month 1: Body Position and Kick Focus

The more streamlined you can become, the more efficient your swimming will be: Think narrow and long. There are many variations of this drill, and my experience shows that the best results come from doing the following three variations in the order below.

Kick on side with no rotation
This is one of the best body-position drills. The objective here is to get comfortable kicking on your side with your bottom arm stretched forward, your ear on your shoulder and one goggle in and one out of the water. This is the ideal position for your head when you breathe. Use fins if you have trouble staying afloat.

Kick on side with one stroke
This drill targets body position and rotation. Perform the kick drill as above, but every five seconds take one stroke and switch from one side to the other. Focus on making a smooth rotation and keeping the body in alignment.
To accomplish this, begin the recovery with your trailing arm, and stay on your side until your hand passes your face, then start to bend the elbow of your leading arm. As the recovering arm enters the water, pull with the leading arm and roll to your other side. Keep your neck in alignment with your spine (don't lift your head) throughout.

Kick on side with three strokes
This drill is the same as the previous drill; however, instead of just one stroke, take three strokes as you rotate from side to side. Drive each rotation with your kick and hips, not your head or shoulders.
I suggest you spend four weeks perfecting these drills by integrating a drill set into every swim workout. For example:
  1. Warm-up: 500 meters/yards
  2. 4 x 50 meters/yards of each kick-on-side drill. Take 15 seconds' rest after each 50 and focus on doing the drill properly
  3. Main set
  4. Cool-down: 300-500 meters/yards

Month 2: The Pull

There are five basic components to the pull cycle: entry/extension, elbow bend (catch), pull, release and recovery. Analyzing your video will show you which parts of the cycle you need to focus on improving. My experience suggests that, most often, pull shortcomings arise when swimmers do not start the pull with a bent elbow, which allows them to catch and hold water.

The Key Drills

Fist drill
This drill is easy to perform: simply swim regular freestyle with closed fists, which will force you to bend your elbow to catch water with your forearms. Be conscious of feeling the water pressure on your forearms as you begin your pull. Swim half a length with closed fists, then open your hands.
The dynamic feeling of opening your hands and feeling the added power from the higher elbow is the positive feedback that makes the change carry over to your regular stroke. Since you actually need to struggle through the water a bit to feel this pressure on the forearm, it's best to do this drill without fins. This is the only drill whose effectiveness isn't enhanced by the use of fins.

Single-arm drill
Swim freestyle but only pull with one arm, keeping the non-working arm either stretched out in front or at your side. Perform this drill in sequences of two lengths, alternating arms with each length. Focus on your elbow bend at the beginning of the pull and on body rotation.
Spend four weeks perfecting these drills by integrating a drill set into each swim workout. Suggested workout:
  1. Warm-up: 500 meters/yards
  2. 8 x 50 meters/yards of fist and single-arm drills. Take 15 seconds after each 50 to re-focus on doing the drill properly
  3. Main set
  4. Cool-down: 300-500 meters/yards

Month 3: Integration

Here's where you start to pull it all together. The main drill here is an old favorite of many coaches and swimmers: the catch-up drill.

Catch-up drill
Begin in a streamlined position with both arms extended straight forward, then pull with one arm, leaving the other arm extended in front until you have finished a complete stroke with the working arm. The catch-up drill can help you develop a longer stroke and body position, which will increase your efficiency.
When first doing this drill, it's helpful to keep both arms in front of your head and kick for a few seconds before switching arms. This gives you time to visualize a proper pull with early elbow bending and good rotation during the power phase. If you see your pull is very short when you analyze your video, scrape your thumb on your thigh at the end of your pull during the drill.
Suggested workout:
  1. Warm-up: 500 meters/yards
  2. 10 x 50 meters/yards catch-up drill. Take 15 seconds after each 50 to re-focus on doing the drill properly
  3. Main set: Start to add long sets to build endurance. An example is 3 x 500 descending
  4. Cool-down: 300-500 meters/yards
There you have it! Take the journey and break out with a faster and more efficient swim next season.

Tuesday, November 16, 2010

How to Use Your Core in Freestyle

Q: I decided it was finally time for me to attempt to integrate more of my core muscles into freestyle rather than simply trying to pull my way through practice. When I was attempting to integrate my core more, I was essentially using my hand as a lever against which to snap my torso, thereby bringing the pulling arm back and extending the other arm, is this the right idea or is there something else I should be going for?

A: Since the water doesn't offer very good traction, it's a bit difficult to use your grip on it—the hand's not a very large gripping surface either—to "snap" something as "massive" (i.e. a significant piece of body mass) as your torso.

It's really not like what occurs when you use your planted feet on solid ground as a base for snapping your torso. Full disclosure: I used this analogy when writing the original TI book 13 years ago. I have since come to see it as a weak analogy because of the significant differences between solid ground and water.

So what emphasis that will work reasonably well in water can you replace that one with? I have found that the following combination works well:

1) Have an intention to use your hands to "hold your place" in the water, rather than to push it back. Your hand will still move back; indeed to an extent it will still push water back. But that intention will cause you to engage core muscle more and arm muscle less.

2) Using the slight leverage offered by that gripping hand/arm, drive the "high side" of your body down. This taps the free energy available from gravity to assist in your intention. It also results in your swimming with your body, rather than using your arms to drag it through the water.

In freestyle, as your left hand is "patiently" establishing a grip, the right hip will be higher than the left. Rather than exert left-arm muscles to push water back, use them to stabilize your hold on the water as you drive the right hip down. Indeed think of using your right hip to drive your right hand past the gripping left. This should result in a sensation of sending energy forward rather than back.

Don't expect to get it on the first try. I've been working at this for seven years, and millions of strokes, and, though it felt promising from the very beginning, it still feels like a work in progress because I've had to undo 30-plus years of swimming with an intention to push water back. But unquestionably I'm using energy more efficiently now than previously.

Terry Laughlin is head coach of Total Immersion. This article comes from the January, 2008 issue of the Total Immersion Online Magazine. Read similar articles atwww.totalimmersion.net.

Friday, September 10, 2010

Key Principles of Open Water Drafting

printed in Active.com

Cyclists, race car drivers and open water swimmers all know the benefits of drafting and positioning.

As swimmers take off in an open water race or triathlon and go from buoy to buoy, they create a conga line with seemingly everyone chasing after the person in front of them. Where ideally should you position yourself?

It helps to know a bit about water movement.

The Ideal Draft

A swimmer in the open water is essentially a displacement vessel. The bow wave created by a swimmer has forward and lateral movement. These waves move at an angle relative to the direction of the swimmer and are based on the swimmer's speed and size.

There are three key facts to keep in mind:

  1. The faster the lead swimmer, the better your draft will be with all other things equal.
  2. The physically larger the lead swimmer, the more beneficial the draft is for those behind.
  3. The closer you are to the lead swimmer, the better your draft.

The Perfect Position

In a fact known by world-class swimmers, drafting between the ankles and hips is more beneficial that drafting directly behind the lead swimmer's feet for various reasons:

  1. When the drafting swimmer reaches near mid-body of the lead swimmer, the lead swimmer's wake (i.e., spreading of the bow wave) has moved laterally, so the drafting swimmer can take maximum advantage of the bow wave. That is, the drafting swimmer has reached the center of the complete wave created by the lead swimmer. Basically, the drafting swimmer is surfing a bow wave.
  2. The bow wave cannot extend beyond the length of the swimmer who creates it. The bow wave lifts up at the end of the swimmer's body. The most efficient swimming is when a drafting swimmer cruises in that wave. The most efficient drafting is achieved if you cruise at the same speed in the wake of the lead swimmer off to the side—but away from the eddies caused by their kick.
  3. In the middle of a race, when the kick of most swimmers is less than the end of the race when they are sprinting, the optimal drafting position is slightly different. At the end of the race when the kick increases, swimmers create swirls by their kick. The more swirls, the more drag. So if your opponent's kick increases, move up higher alongside their body to utilize their bow wave, but far enough away from the swirls and eddies caused by their kick.
  4. Combine your speed with the speed of the lead swimmer. If they speed up, you speed up. If they slow down, you slow down. If you are directly behind them, lead swimmers make the water smoother, but you are not efficiently utilizing their bow wave.
  5. If you swim alongside a lead swimmer, you do not have to lift your head so often to navigate. This saves energy that can be utilized at the end of the race. If you swim directly behind a swimmer, you must often lift your head to confirm your direction and position behind the lead swimmer.
  6. Even if the water is clear and you can easily see the lead swimmer under the surface of the water, your head is in a sub-optimal position. The most optimal head position is when you are looking straight down. This creates a more streamlined and efficient body position, saving you energy and creating less drag.
  7. When you swim parallel to the lead swimmer, you can effectively navigate off them when you breathe. The need to lift up your head to sight is significantly reduced and your head is positioned in the most streamlined position.

There are many other factors that come into play when drafting and positioning as world-class athletes do, but these basic factors are enough to get started.

Steven Munatones is a multi-time USA Swimming national open water swim team coach, NBC Olympics marathon swimming commentator, International Marathon Swimming Hall of Fame inductee and 1982 world 25K swimming champion. He created the Open Water Swimming Dictionary, and conducts race analysis and research on open water swimming—from drafting to stroke technique—for the website The Daily News of Open Water Swimming.

Photos by Javier Blazquez.

Monday, May 10, 2010

Proper Wetsuit Care

From USATriathlon

Most wetsuits are constructed with the fastest and most technologically advanced materials available. Because of this, your wetsuit is delicate and requires proper care and handling to prolong its life. USA Triathlon Wetsuits has a few tips on how to best care for your wetsuit.

GENERAL CARE

Do:

  • Rinse inside and out with fresh water after each use paying close attention to the zipper area.
  • Hang to dry inside out on a thick padded hangar (not wire). Do not leave your wetsuit in the direct sunlight.
  • Store your dry wetsuit in a cool dry place, laying flat folded across the waist.
  • For travel, fold your wetsuit according to the following diagram. Do not fold your wetsuit lengthwise.

Don't:

  • Do not use petroleum based products like Vaseline on your suit.
  • Do not use your suit in chlorinated water.
  • Do not use your wetsuit for sports other than swimming.
  • Do not hang your wetsuit for a prolonged period of time. This could put stress on the rubber in the shoulder area causing it to stretch and possibly crack.
  • NEVER leave your wetsuit folded in a hot car or in direct sunlight! The rubber in your wetsuit will fuse.
  • Do not put your wetsuit in a washing machine or dryer. Do not dry clean your wetsuit.
  • Be very careful when putting your wetsuit on and taking it off. The rubber in your wetsuit is very technologically advanced, making it extremely flexible and comfortable but also making it susceptible to nicks and tears from sharp objects, especially fingernails.

Saturday, March 20, 2010

The Lesson I Learned Swimming Today

Today my swim set called for 30 x 25 yards with 20 seconds rest. Except I did it wrong. Even though I had written it down correctly and actually looked at the card while I was swimming, I still did it wrong. I actually did 30 x 50 yards. Ooops, double. They were supposed to be done at a moderately fast pace, with focus on form. That was the key, the form. So I did the first 24 of them, keeping the same time. But at the 25th, I felt my form totally falling apart. So I decided to slow it down a little and bring the focus back to my form. And you know what? Even though I slowed it down, my time was still exactly the same as the other ones. Why? Because my form was better!

The lesson today kids is:

Your form is uber-crucial in swimming. If you don't have it, take lessons. Do drills, have someone watch you, take a clinic. Lots of yardage in the pool will not help you much, except if you like injured shoulders and me passing you! :-) Spend the time that you need to so you do it right.

Happy swimming!
- LaVonne

Friday, March 19, 2010

Team LUNA Chix Training Videos

Check out the training videos on the Team LUNA Chix site! They are done by the pro's with good tips on training and nutrition. There are three:

Swim Tips
Sports Nutrition for Women
Bike Handeling Skills

Watch them all!

Sunday, March 14, 2010

Learning to Breathe Bilaterally

You may already have heard the most commonly asked question in the swimming world today. Which of the following techniques is superior: breathing to one side, or bilateral breathing?

Until just one year ago, I breathed to the right side every time I got in the pool. Why, do you ask? Simply because taking breaths on the opposite side didn’t feel right! Indeed, this is the primary reason that the majority of swimmers take breaths on just one side. About a year ago, however, I was getting a massage, and the therapist noticed that the muscles on the left side of my back were considerably more developed than those on the right. Thinking for a moment, I realized that thousands of laps of breathing only on the the right side had caused these muscles to balloon as I balanced on my left arm while sucking in air!

So, if you haven’t figured it out yet, the answer is bilateral breathing. The primary reason is that bilateral breathing will work to balance your stroke (not to mention leave your back looking normal!). If you continue to breath to one side, you risk having your stroke become lopsided. In just one hour in the pool, you’ll roll to your breathing side approximately one thousand times. A stroke that is lopsided can quickly become pernanent when you practice a lot!

There are other benefits to bilateral breathing, as well. Once you lose your “weak side”, you’ll no longer be blind in that direction. If you’re an open water swimmer, you’ll be able to avoid chop, check for landmarks, and keep pesky swimmers from splashing you in the face (or even punching you as they jockey for position!).

So how do you obtain these benefits? Simply by practicing bilateral breathing at every opportunity possible. In my evening session, I’ll have swimmers breathe each 3 or 5 strokes, as they warm up or down. Of course, in practice, this kind of drill shouldn’t be limited to workouts alone. To be sure, at first you will probably feel quite awkward. You’ll quickly find, however, that bilateral breathing becomes more natural as you practice. Before you know it, you’ll be breathing to both sides like a champ.

Here are some tips to get you breathing on both sides, while keeping your workouts interesting.

1. Breathe to alternate sides each length: once to the left, and once to the right. This way, you’ll get the oxygen you need, while developing the symmetrical stroke you’re after.

2. During warm-ups, warm-downs, and slow sets, breathe to your weaker side.

3. Experiment with different patterns such as three left, three right, or four left, four right, until you find what works for you.

Each week, keep your ultimate goal of bilateral breathing in mind. Perhaps most importantly, however, don’t get too hung up on getting the breaths exact. Have fun, and enjoy your swim, because breathing to both sides will eventually come naturally!

Sunday, January 24, 2010

Swim Training Outside the Pool

From Competitor

* December 27, 2009

With the winter and holidays comes pool closures. Professional triathlete Sara McLarty has some dry land swim workouts to try out when you can’t get in your local pool.

Written by: Sara McLarty

The National Training Center pool, in Clermont, Fla., was closed on Labor Day for both the holiday and for maintenance. The swimmers were unaware of the undertaking until we arrived for swim practice on Tuesday and peered down into a half-filled pool. This meant we had spent a total of three days out of the water since our last practice on Saturday morning. Getting a balanced number of practices is very important for multisport athletes, but I didn’t panic about this unplanned absence from the water. Instead, I used my knowledge and experience of swimming-specific strength training and got a great “swim practice” in the gym.

The following exercises are not just for days when you can’t swim in the pool. You will see improvement in the water just by including these strength-building and injury-prevention exercises into your regular gym session. It can be as easy as adding a swimming specific five to 10 minutes at the end of your regular strength routine. By staying ahead of the curve with overused joints and muscles, you can reduce the chance of being sidelined for a sore shoulder or another malady.

I perform all of these exercises during my gym sessions three times each week.

Shoulder strength is very important because I have dislocated my shoulders multiple times during my swimming career. Keeping all those little muscles strong is critical to preventing another trip to the emergency room. When I am traveling, I try to stay on top of the easier things, like core strength.
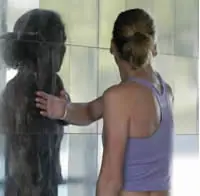
Abs

All of your power in the water comes from core strength. The kick starts at your hip flexors and gluteus while your arm stroke uses lats (latissimus dorsi), upper back and pectorals. Strong abdominal and oblique muscles are critical for good hip and body rotation through the water. There are some swimming-specific core exercises that can be mixed in with other crunches and sit-ups.

Supermans are performed by lying flat on your stomach with your arms stretched out over your head. Slowly lift your legs, head and arms. Pause about six inches off the ground (you should look like Superman in-flight) and then slowly lower everything. Pause again before repeating. Do two to three sets of 10 to 15 lifts. You should feel this in your lower back.

Side crunches are often overlooked. My favorite exercise is performed on a medicine ball by lying on my side and bracing my feet against the bottom of a wall. First, I lock my hands behind my head, face completely sideways, and crunch my top elbow toward the wall. After just 20 reps, I switch to the other side, sometimes pausing in the middle to perform a quick set of regular medicine ball crunches. Do two to three sets of 15 reps on each side.

Plank hold is a stability exercise for your whole core. The proper position looks a little like push-up-position by balancing on your toes with a strong, flat back. Keep both forearms on the ground; they should form a triangle under your face, with hands clasped under your forehead. Use a stopwatch or the second hand on a wall clock and try to hold yourself up for 30 to 45 seconds. As your core becomes stronger, try for 60 to 75 seconds. Do two plank holds each session.

Flutter kicks are great for strengthening your hip flexors. If you ever do a long or hard kicking set in the pool, you should feel these little guys screaming afterward! These are the same muscles used in the up-pedal stroke on your bike. Lie on your back, with your hands under your butt cheeks for support. Lift your head and shoulders off the ground, look down towards your feet. Lift your legs 5 to 7 inches off the ground, point your toes and flutter kick (just like freestyle kick in the pool). I like to time this exercise, between 30 and 60 seconds, two sets per gym session.

Shoulders

As previously mentioned, my shoulders are something I never forget about in the gym. After years and years of the repetitive motion of freestyle, my ligaments are very loose. I use the following exercises to keep the containment muscles strong and prevent future injuries.

Three way is basically three similar exercises combined into one session. Use small hand weights, between four and seven pounds. Start by holding the weights at your sides and perform all lifts with straight arms to shoulder height. First, lift your arms out to the sides (90 degrees), palms down. Lower slowly. Then, lift your arms in front of you, shoulder width apart (10 degrees), with palms facing each other. Lower slowly. Finally, lift your arms at 45 degrees, palms facing away from each other. Lower slowly. Do two sets of 12 to 15 lifts.

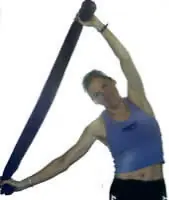
Overhead press: With slightly heaver weights, between 10 and 15 pounds, perform two sets of 10 to 12 reps of this exercise. Because the position of your arms is very important, I recommend standing in front of a mirror. Start with the weights next to your head, palms facing the mirror, shoulders and elbows at 90 degrees. Press the weights straight up with extended arms and lower them slowly to the start position. Next rotate your shoulders around in front of your face (keep elbows at 90-degree angles), turn your palms toward your face, and tap the ends of the weights together. Return to the start position and repeat.

Up-out-in-down is pretty self-explanatory. Use medium to light dumbbells for this exercise (5 to 10 pounds) and start with your arms at your sides, palms facing your hips. Lift the dumbbells straight up in front of your body to shoulder height. Spread your arms out to the side of your body (keep them at shoulder height), bring them back in together and then lower them back down to your sides. Repeat this motion 10 times, rest, then do a second set.

Rowing is a great strength exercise to prevent “swimmer’s slouch.” Multisport athletes tend to swim a lot of freestyle, resulting in overdevelopment of the chest muscles. You can counter this slouch by working the trapezius muscles with a rowing machine or just some dumbbells and a bench. I prefer to use the rowing machine so I can focus on using my shoulder blades to pull the weight slowly, and release the weight slowly. Think about pinching your shoulder blades together each time. Do two sets of 10 to 12 reps.

If you have access to a swimming machine like a Vasa, IsoCircuit or Halo swim bench, then a day or two out of the pool is not a concern. These tools so closely mirror the swim stroke that your body will hardly know the difference. The worst consequences of being out of the pool for a few unplanned days: Your skin will stop smelling like chlorine during other training sessions (have you ever caught a whiff of your sweat on a post-swim practice run?) and your goggle tan might fade a bit (raccoon, anyone?).

Wednesday, January 13, 2010

5 Tips to a Better Swim

From triswimcoachonline.com

Here are some tips to keep in mind as you progress to a more efficient, faster freestyle in your next triathlon!

1. Keep your head down- look down at the bottom of the pool

2. Don't bend your knees- well, a little knee bend is okay on the kick, but get your power from your quadriceps muscles and hips as opposed to trying to kick at the water.

3. Extend your arm with each stroke- glide!

4. Pull all the way through your stroke- finish the pull with an extended arm.

5. Breathe! Ultimately, breathing every 3 strokes is a good idea, but in your beginning stages, just getting air is more important- so start with what works.

Keep sticking with it and when you're ready, check out the additional resources on triswimcoachonline.com

Kevin Koskella
Tri Swim Coach

Thursday, November 12, 2009

"How To" Videos from Marc Evans Coaching

Recently I was looking through You Tube to find videos of how to run downhill. I've started hill repeats to prepare for my hilly half marathon in November, and had forgotten how painful they are on my joints. I wanted to learn the right way to do it.

Anyway, I came upon this series of videos from Marc Evans describing everything from Running Balance Drills and Testing to Swimming: How to Breathe Freestyle. I thought it might be something some of you would be interested in checking out!

http://www.youtube.com/user/evanscoaching


Website:


http://www.evanscoaching.com

The Evans Coaching Channel provides professional technique coaching and instruction in swimming, cycling and running, dryland training and workout modeling.

Coach Evans works with beginners, recreational, competitive, elite, professional and coaches.

The videos are intended to be viewed as if working with coaching Evans 1-on-1.

The channel is updated bi-weekly with new videos in: Swimming, Cycling, Running, Fitness, Q+A, and Workouts for endurance sport-triathlon.

Thursday, November 5, 2009

3 Swimming Drills for the Offseason

3 Drills for the Offseason (or Anytime!)

1. Kick WITHOUT a kickboard, On your side. This improves balance in the water and with practice, will improve your kick. Also, stretch your ankles- ankle inflexibility is the #1 reason for a weak kick!

2. One-Armed Freestyle. Freestyle only using one arm to stroke, while keeping the other arm at your side. Rotate your hips as if you were swimming full strokes. Breathe to the opposite side of your stroking arm.
WARNING: This is a more advanced drill and will take some practice to get it right!

3. 3/4 Catchup Drill. Many coaches will have you doing Catchup Drill- touching your hands out in front in freestyle with each stroke. The problem with this is that it keeps you on your stomach too long, when you want to be rotating from one side to the other. 3/4 Catchup means as you slice one hand into the water, start your pull with the other hand. It’s “almost” catchup. This helps with balance and rotation.

from www.triswimcoachonline.com

Tuesday, November 3, 2009

Splish

Splish makes the greatest swimsuits! Not only are they good quality, but they have the cutest and sassiest prints around! They come in racerback, thin strap, super thin strap and bikini styles, so there is something for everyone! Most are also available in men's as well - so you can match (if you are so inclined)! Matching accessories are available too. www.splish.com

Here are some of my favorites (shown in the different styles)!


They give a discount for group orders:
Order 5–10 items and get 5% off.
Order 11–20 items and get 10% off.
Order 21 or more and get 20% off.


You can also custom design your own suit!