![]()
Dr. Lisa Cannada, a runner and orthopedic surgeon, offers advice on knee, foot and ankle pain.
As a new runner, I'm not sure when to run through the pain and when to stop and see a doctor. How can I tell the difference between muscle soreness and an injury?
Just because you feel uncomfortable tightness or some minor pain while running doesn't necessarily indicate you have an injury. You could simply be doing something different--running on a new type of surface or terrain, for example--that works your muscles in a new way. If you only feel pain while you are running, and it goes away within two weeks, it's most likely a strain or soreness.
But there are times when it's crucial to see a doctor, as you could have a variety of more serious conditions. Here are four easy ways to know when you should schedule an appointment:
My knees hurt when I run. What can be causing this and what can I do about it? It seems every female runner I know suffers from knee pain.
The No. 1 cause of knee pain for female runners is anatomy. Most women have a larger Q-angle--the angle between the pelvis and the knee--than men. This increased angle can cause a wide variety of problems, from placing stress on the knee to causing foot pronation (an inward roll of the foot).
The easiest way to minimize knee pain caused by your Q-angle is to strengthen the quadriceps muscles. By strengthening the quads through weight exercises such as leg extensions, you can reduce the stress being placed on the knees.
I recommend strength training three times a week to see improvements. Also, building up your quads is vital if you do a lot of hill running. Running downhill is one of the easiest ways to hurt your knees if you don't have the strength in your quads to support them.
Overuse is another major cause of knee pain. Never increase your mileage by more than 10 percent per day or week, no matter how good you feel. Other common causes of knee pain include being a "weekend warrior" and attempting too much without ample training, bad running form or something as simple as tasks around the house that involve squatting or lifting small children.
After my last marathon, I developed a severe case of iliotibial (IT) band syndrome and spent three months in physical therapy. I'd like to run another marathon, but don't want this to happen again. What can I do about it?
I get so many visits from patients with this problem. IT band syndrome is inflammation in the tendon that runs from the hip to just below the knee. Highly painful around the knee for many runners, the problem most commonly occurs during marathon training.
It happens for a variety reasons, including running constantly on the same angle--like the same side of a slightly canted street during all of your runs. But the biggest cause is increasing your mileage too quickly. Remember the 10 percent rule!
Adding activities like swimming and using an elliptical machine can help keep your endurance up without aggravating the condition. If the pain lasts longer than two weeks, see a doctor. Physical therapy may be recommended.
To prevent this condition, you need to stretch the IT band regularly--not just after you run but at least five days a week. Adding cross-training into your regular schedule can also help. If you don't take preventative action and you let IT band syndrome become severe, you may end up sidelined from running again.
Many people in my running club have problems with plantar fasciitis. What causes this and what can be done to prevent it?
This is the worst! Plantar fasciitis, which can cause a burning or stabbing sensation in the heel, is most common in people with flat feet. Anatomy and wearing the wrong shoes for your foot type are common causes.
Here's a simple way to know if you have an inflammation of the plantar fascia tissue: if the pain is at its worst when you first get up in the morning. Because these tissues in your feet contract as you sleep, the pain can be significant until your feet limber up, and then it will reduce in intensity.
If you have this type of pain for more than two weeks, go see your doctor. They can provide you with an easy cure: a night splint, which stretches the tissues as you sleep.
After a long run, do ice baths help reduce muscle soreness and inflammation? If so, how soon should you take one for it to be effective?
You don't need to take an ice bath unless you are in the top five percent of elite runners, who build up a lot of lactic acid in their muscles. (Most of us never have that much lactic acid in our bodies.) I feel stretching and taking an anti-inflammatory are much better at reducing soreness and inflammation for the average runner. If you are training for a marathon, regular massages can help reduce muscle soreness.
I commonly counsel athletes who skip breakfast, grab only a light lunch, train on fumes, gorge at dinner and snack on "junk" until bedtime. They not only rob their bodies of the nutrients needed for health, but also lack energy for high-quality workouts.
A satisfying breakfast tends to invest in better health than does a grab-anything-in-sight dinner. Sarah, a collegiate athlete, learned that fueling her body's engine at the start of her day helps her feel more energetic and also able to choose better quality lunch and dinner foods.
That is, when she has granola, banana and juice in the morning, as well as a sandwich and yogurt for lunch, she stops devouring brownies after dinner.
Excuses to skip breakfast are abundant: "No time," "I'm not hungry in the morning" and "I don't like breakfast foods." Weight-conscious athletes pipe up, "My diet starts at breakfast."
These excuses are just that, excuses; they sabotage your sports performance.
Here's a look at the benefits of eating breakfast. I hope to convince you that breakfast is the most important meal of your sports diet.
Breakfast for Dieters
If you want to lose weight, you should start your diet at dinner, not at breakfast! For example, do not eat a meager bowl of Special K for your "diet breakfast." You'll get too hungry later in the day and crave sweets.
A bigger breakfast (cereal + toast + peanut butter) can prevent afternoon or evening cookie-binges. An adequate (500 to 700 calorie) breakfast provides enough energy for you to enjoy your exercise, as opposed to dragging yourself through an afternoon workout that feels like punishment.
If you are trying to lose weight, you should target at least 500 to 700 calories for breakfast; this should leave you feeling adequately fed. [So NC has it about the same, if eat 2000 calories a day - L]
To prove the benefits of eating such a big breakfast, try this experiment:
1. Using food labels to calculate calories, boost your standard breakfast to at least 500 calories. For example, add to your english muffin (150 calories): 1 tablespoon peanut butter (100 cal.), 8 oz. orange juice (100 cal.) and a yogurt (150 cal). Total: 500 calories.
2. Observe what happens to your day's food intake when you eat a full breakfast vs. a skimpy "diet breakfast." The 500+ calorie breakfast allows you to successfully eat less at night and create the calorie deficit needed to lose weight.
Remember: Your job as a dieter is to fuel by day and lose weight by night. Successful dieters lose weight while they are sleeping; they wake up ready for another nice breakfast that fuels them for another high-energy day.
Breakfast for the Morning Exerciser
If you exercise first thing in the morning, you may not want a big pre-exercise breakfast; too much food can feel heavy and uncomfortable. However, you can likely tolerate half a breakfast, such as half a bagel, a slice of toast, or a banana before your workout.
Just 100 to 300 calories can put a little carbohydrate into your system, boost your blood sugar so that you are running on fuel, not fumes, and enhance your performance.
You'll likely discover this small pre-exercise meal adds endurance and enthusiasm to your workout. In a research study, athletes who ate breakfast were able to exercise for 137 minutes as compared to only 109 minutes when they skipped this pre-exercise fuel.
After his morning workout, Jim, a banker, felt rushed and was more concerned about getting to work on time than eating breakfast. Using the excuse "No time," he overlooked the importance of refueling his muscles.
I reminded him: Muscles are most receptive to replacing depleted glycogen stores within the first two hours after the workout, regardless of whether or not the athlete feels hungry. I encouraged Jim to be responsible! Just as he chose to make time for exercise, he could also choose to make time for breakfast.
One simple post-exercise breakfast is fluids. Liquid breakfasts take minimal time to prepare and very little time to drink, yet they can supply the calories, water, carbohydrates, protein, vitamins and minerals you need all in a travel mug. (You can always get coffee at the office.)
Because Jim felt thirsty after his morning workout, he found he could easily drink 16 ounces of juice or lowfat milk. Sometimes, he'd make a refreshing fruit smoothie with milk, banana and berries.
Later on mid-morning, when his appetite returned, Jim enjoyed the rest of his breakfast: (instant) oatmeal, multi-grain bagel with peanut butter, yogurt with granola, a banana or any other carbohydrate-rich foods that conveniently fit into his schedule.
This nutritious "second breakfast" refueled his muscles, abated hunger and curbed his lunchtime cookie cravings.
Breakfast for the Noon-time, Afternoon and Evening Exerciser
A hearty breakfast is important for people who exercise later in the day. It not only tames hunger but also provides the fuel needed for hard workouts.
Research has shown that athletes who ate breakfast, then four hours later enjoyed an energy bar five minutes before a noontime workout were able to exercise 20% harder at the end of the hourlong exercise test compared to when they ate no breakfast and no pre-exercise snack. (They worked 10 percent harder with only the snack.)
Breakfast works! Breakfast + a pre-exercise snack works even better!
What's for Breakfast?
From my perspective as a sports nutritionist, one of the simplest breakfasts of champions is a wholesome cereal with lowfat milk, banana and orange juice. This provides not only carbohydrates to fuel the muscles, but also protein (from the milk) to build strong muscles, and numerous other vitamins and minerals such as calcium, potassium, vitamin C, iron (if you choose enriched breakfast cereals) and fiber (if you choose bran cereals).
Equally important is the fact that cereal is quick and easy, requires no cooking, no preparation, no refrigeration. You can keep cereal at the office, bring milk to work and eat breakfast at the office. Breakfast is a good investment in a productive morning.
The Bottom Line
Breakfast works wonders for improving the quality of your diet. That is, eating breakfast results in less "junk food" later in the day. Breakfast also enhances weight control, sports performance, daily energy levels and future health.
Breakfast is indeed the meal of champions. Make it a habit no excuses!
Sample Grab-and-go Sports Breakfasts

Sausalito, CA. LUNA Sport, makers of luxurious cycling clothing for women, has created a program that provides local influencers with LUNA Sport product. In 2010 the LUNA Sport Luminary™ program will outfit 50 influential women around the United States and Canada with a full complement of LUNA Sport clothing and accessories.
The Luminary program is inspired by the efforts of the women working in non-competitive roles in cycling and fitness -women who work as hard as Olympians, but purchase clothing, bikes and equipment to conduct their businesses. The Luminary program aims to provide these strong leaders with access to performance cycling product sufficient for all of their workouts and group events.
"The Luminaries will assist in providing Luna Sport with relevant product feedback - while also spreading the LUNA Sport message to targeted audiences around the U.S. and Canada," said Marla Streb, former LUNA pro and Luminary program manager.
LUNA Sport is accepting resumes for the Luminary Program at http://www.lunasportgear.com/contacts. Applicants will complete the field titled "Your Message," with a brief overview (100 words or less) of their Luminary qualifications. LUNA Sport will review the brief and contact prospective members by 12/1/10.
· The LUNA Sport Luminary™ program will outfit 50 influential women with a full-complement of LUNA Sport clothing and accessories for the 2011 cycling and fitness seasons
· LUNA Sport Luminaries are women working in non-competitive roles in cycling and fitness
· Qualified women can apply online at online by going to http://www.lunasportgear.com/contacts
I was going to write a post for the 1/2 Vineman rookies, but this is a good opportunity to dump some thoughts for someone who is new to this distance or has blown up previously.
[1] Go out easy on the swim - the swim makes no difference to your overall performance. Use it as a warm-up for the bike. Two minutes faster on the swim can result in 20 minutes slower on the run. I ran past 250+ people at Wildflower last year. In an IM race, I typically pass 5-800 people with this strategy.
[2] Go out easy on the bike - your body will need about 6-10 minutes to make the adjustment from swimmer to rider. Take the first part of the ride easy in an easy gear. Initially drink water or highly diluted sports drink. Don't start eating until your HR has settled to your normal bike pace. It is okay for the HR to be a little high at the start but if this is the case then you should feel like you are pedaling VERY easy. Remember, it is a long day - there will be plenty of time to hammer later.
[3] About 15-20K into the bike it is time to start eating. By now you have let your HR settle and you have found a pace that feels comfortable. Personally, I will be racing Vineman at 10-15 bpm below my AT. On my first 1/2 IM I was 20-25 bpm below my bike AT. For your first race, remain aerobic at all costs.
[4] 45-75K is, for me, the crux of the bike - this is where you should be fueling up and maintaining concentration. It is easy to get distracted in this period. Maintain concentration, maintain fluid intake and EAT.
[5] Overall, the purpose of the bike is to replace what you lost on the swim and prepare yourself for the run. There are ZERO benefits to hammering - let the hammerheads go. You will see them later [if you don't then they are faster than you anyhow ;-) ] Find a steady, comfortable pace. Stay aero, hydrate and focus. Remember that good body position is golden in a long race.
[6] Now the run. Start the run SLOW - are you noticing a pattern here? Many people do 1-5 above and then arrive at the run feeling great. They then blow their load in the first mile. Remember that you are about to run a half marathon. I normally leave a frozen bottle of drink at T2 so I can have a cool beverage to start the run. I run the first two miles real slow [please use your own definition here]. Normally, my stomach is full of food and water from the bike. Stitches are common as is a feeling that your legs will never come right. Believe in yourself, believe in your legs and they will come right somewhere between the 3-5K mark (assuming you listened to me about the bike!).
[7] Personally, I like to think about the run as really 4 x 5K. My strategy is to run the first 5K slowly. All I want to do is find my rhythm, hydrate and ensure that I am fueled up for the real race, about to begin shortly. Don't sweat your HR. The name of the game is getting your running muscles going.
[8] The second and third 5K pieces are where it all happens. You are still focusing on running steady. Here you can use your HRM to make sure that you don't run too fast and also make sure that you are not dogging it. If you are having trouble getting your HR up then get on the sports drink or cola if available. If your HR is running very high but you feel OK then this could be a sign of dehydration - water, water, water.
[9] Somewhere in the 8-16K region, you will have a period that feels absolutely awful (at least I always do). Stick with it. It will only last about 5-10 minutes and then you will be through it. Push through these problem times and you will get out the other side. Believe in yourself as an athlete.
[10] Hopefully, you are now around the 15K mark. You are tired but a bit stoked that things have gone so well. You can sense the finish line and you can do the math to see that you are going to beat your goals. You have run a smart race to here and will achieve/exceed your goals. Now it is HAMMER TIME. If you feel like it then rev your pace up. You will know the right amount to increase. Keep it aerobic but it is OK to get a good sweat going. Remember to continue to take fluids at every aid station, particularly around the 15/16/17/18K marks. Just ask PNF about the risks of skipping aid late in the game.
[11] Once you hit mile 12 (19K) spend everything you have, or simply enjoy the tailend of the race. I have done both.
As always, YMMV
TURN THE CORNER: Set up well in advance of a curve and do whatever braking needs to be done before entering the turn. If you are riding in a group, move away from the others. This will allow you to take your preferred line through the corners, which is critical because you may not have time to adjust once you commit. It also allows a greater margin for slowing.
BRAKE IT DOWN: For long descents, use both brakes equally. Remember that once you're in a turn, any traction used for shaving speed significantly reduces the traction available for cornering. In wet conditions, it will take you longer to stop. Lightly apply the brakes periodically on a wet descent to remove excess water from the rims.
BE READY: Don't compete on descents with anyone other than yourself. That's because on any unfamiliar road, caution is paramount: You should always be prepared for road debris or traffic around every blind corner.
EASE UP: The most important aspect of descending is relaxation. Anxiety can narrow your concentration, which could cause you to miss a hazard in the road ahead. And the best way to be relaxed is by practicing descending as often as possible.
I will add: Stay within your comfort zone! Not worth it to go out of control. But the more you practice, the more you will be able to push the comfort zone.
This is from bicycling.com.
Most of us invariably need to ride close to vehicles on the road. It's a trite analogy, but I always keep it in mind: two tons of metal versus about 200 pounds of bike, bone and muscle--who's going to win? Here are key survival skills.
Look and listen
First of all, pay 100 percent attention, just as you would while driving. Use your senses--often you can hear an engine in advance of the car, and see or hear a dog before it chases. Problem sounds include tires squealing, hard engine acceleration and loud music from an open window. If I hear these I pull over to let the vehicle pass.
Pick smart routes
The best roads have few cars, low speed limits and no blind corners. Often, a slightly longer route with fewer cars will be faster than a shorter, busier one. Also, try to find roads with a shoulder you can ride on. Yes, we are vehicles with the right to be on the roadway, but with two tons versus 200 pounds, I prefer to stay clear when I can do so safely.
Don't keep secrets
When you drive, you use turn signals, and your car has brake lights. As you ride, try to think of what drivers will see as they drive up behind you. Use hand signals to indicate where you intend to go. At intersections, make eye contact with drivers to ensure that they see you. Also, for future goodwill, wave a thank-you when you're given the right of way.
Stay steady
Looking behind you without swerving is an essential skill. For new riders, simply glancing back with your hands on the brake hoods may work, but this method often causes the bar to turn in the direction you're looking. This way is better:
To look left, move your right hand toward the center of the handlebar near the stem, then drop your left hand off the bar as you turn your head to look back. Track racers use this technique when doing a Madison relay change. Watch the Madison at the Olympics this year--magic bike handling. Keep your upper body relaxed the entire time and practice, ideally in an empty parking lot with lines you can follow.
Hook your thumbs
Always wrap your thumbs around the handlebar, instead of laying them across the top. I can't tell you how many times I've seen a rider go down after his hands were jarred off the bar when he hit a bump. Also, please, no aero riding on busy streets. Save it for when you're on a smooth road with few cars.
Alex Stieda, the first North American to wear the yellow jersey in the Tour de France, with 7-Eleven in 1986, leads tours and skills camps (stiedacycling.com).
A century ride is a milestone nearly every cyclist strives to reach. The roadblock for most of us is finding the time to prepare. With only so many hours in the day, most of which we spend working and sleeping, ride time is limited. This eight-week plan will have any determined cyclist ready to hit 100 with just three rides per week: one long, one steady and one speedy. On rest days, remember to do something to keep your body moving.
Long Ride: The Meat
In your first week, you'll want to ride 1.5 to 2 hours, or about 20 miles, and build from there. (If you're already comfortable with a longer ride than week 1 prescribes, start with 2.5 to 3 hours and follow the same guidelines for mileage building, topping off at about 85 miles.) Do your long rides at a steady, but not taxing, pace—about 70 to 75 percent of your maximum heart rate. Though most cyclists find that Saturdays or Sundays work best for their long rides, it doesn't matter which day you choose as long as you get it done.
Steady Ride: The Bread and Butter
During these rides, aim for two to four longer efforts (15 to 30 minutes in length; 15 minutes easy pedaling in between) that increase your breathing and elevate your heart rate to around 80 to 85 percent of your maximum heart rate(MHR). Ride at threshold, as if you're pedaling with someone slightly faster than you. These rides will simulate your goal for your century and train your body to ride more briskly while maintaining comfort, so you can finish 100 miles faster and fresher.
Speed Ride: The Secret Sauce
Distance riders often skip speed work because they think they need volume, not intensity, to go long. But riding fast improves your endurance by raising your lactate threshold, the point at which your muscles scream "Slow down!" When you raise this ceiling, you can ride faster and farther before your body hits the brakes. Aim to do four to six very hard or max efforts ranging from 30 seconds to two minutes; in between, spin easy for twice the length of the interval. Do these on a challenging stretch of road, such as a hill or into a headwind.
Finishing a century means making the best choices for all 100 of those miles.
SPACE OUT: Stuffing yourself full of calories prior to the ride will divert blood to your stomach, which weakens your legs and slows you down. Instead, eat a carbohydrate-rich breakfast of 400 to 500 calories two to three hours before the event. Then aim to eat and drink 200 to 300 calories every hour thereafter.
KEEP A STEADY FLOW: Consume at least one bottle's worth of energy drink per hour (more if it's hot) to provide electrolytes and a few carbohydrates. Choose a flavor that will entice you to sip often.
PEDAL YOUR PACE: The biggest newbie mistake is letting yourself be seduced into speeding along with faster riders early in the day, only to crack 60 miles in. Fall in with riders who pedal your pace and avoid going into the red (feeling breathless) for the first 50 miles. You'll finish fresh and strong.
MOVE AROUND: Avoid aches and pains in your neck and back by changing your hand position often and standing out of the saddle to stretch periodically.
KEEP IT SHORT: Take advantage of rest stops to use the bathroom, refill bottles, stretch and grab some food. But don't linger. A stop that lasts more than 10 to 15 minutes will cause your legs to stiffen up and make it harder to get going again.

Ladies, we all know that our periods affect our workouts. I, for one, am cramping like crazy—finding the motivation to work out right now is hard, no matter how much chocolate milk I’ve promised myself once I’m done. But it’s not just the cramps and cravings and bloating that has an effect on how we exercise, and, as it turns out, if you understand the relationship, you can get more out of your workouts. And frankly, I’m all about getting as much out of the work I’m doing as possible.
To learn more about the subject, I got in touch with Jade Teta, a holistic physician, personal trainer, and health and wellness consultant and founder of Metabolic Effect.
First things first—a quick tutorial on the different phases of the menstrual cycle (and no, it doesn’t just break down to being “on” or “off” your period).
There are two phases, follicular which begins on the first day of your period and lasts 10-14 days, and the luteal phase. The two phases are separated by ovulation, or the release of an egg from the ovaries, 14 days or so before your next period starts.
“The follicular phase is associated with higher estrogen levels compared to progesterone, while the luteal phase is the reverse,” Teta explains.
So how can we use our menstrual cycle to guide our workouts for maximum effect? Easy!
“Estrogen (higher during the follicular phase) increases the amount of fat burned during exercise, but makes sugar burning less efficient,” Teta says. “Progesterone (higher during the luteal phase) opposes the action of estrogen. Since lower intensity exercise burns more relative amounts of fat, and higher intensity is fueled more by sugar burning, women can cycle their training modalities to work with these fluctuations.”
So, for the first half of your cycle, go for slow and steady longer workouts (like walking, biking or jogging). For the second half, kick up the sprints and interval workouts (sprint and interval training, which can rev your metabolism for hours or even days after your workout).
And, if you’re a strength junkie, don’t worry. Weight training is beneficial across the board, Teta says, although you might want to focus on “traditional weight training during the follicular phase and more metabolic-conditioning weight exercise done in the luteal phase and during menses.”
And remember, diet is still a factor—no matter what phase of your cycle you’re in.
“Research shows that carbohydrate-loaded women—i.e. those eating high-carb diets—will likely wash out any beneficial impact of the menstrual cycle, so, all of the above is likely more beneficial for women dieting or eating [a] fairly low carb [diet].”
Fascinating stuff! Have you noticed a difference in your workouts throughout the month? Tell us about it in the comments! —Kristen
printed in Active.com
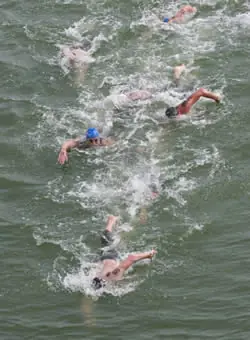
Cyclists, race car drivers and open water swimmers all know the benefits of drafting and positioning.
As swimmers take off in an open water race or triathlon and go from buoy to buoy, they create a conga line with seemingly everyone chasing after the person in front of them. Where ideally should you position yourself?
It helps to know a bit about water movement.
A swimmer in the open water is essentially a displacement vessel. The bow wave created by a swimmer has forward and lateral movement. These waves move at an angle relative to the direction of the swimmer and are based on the swimmer's speed and size.
There are three key facts to keep in mind:
In a fact known by world-class swimmers, drafting between the ankles and hips is more beneficial that drafting directly behind the lead swimmer's feet for various reasons:
There are many other factors that come into play when drafting and positioning as world-class athletes do, but these basic factors are enough to get started.
Steven Munatones is a multi-time USA Swimming national open water swim team coach, NBC Olympics marathon swimming commentator, International Marathon Swimming Hall of Fame inductee and 1982 world 25K swimming champion. He created the Open Water Swimming Dictionary, and conducts race analysis and research on open water swimming—from drafting to stroke technique—for the website The Daily News of Open Water Swimming.
Photos by Javier Blazquez.
[Highlights taken from an article that appeared in Active.com]
There are interesting new tools designed to aid the bike fitting process.
Some incorporate dynamic motion sensing and capture technology. As a gadget guy, I am compelled by new technology, and I often get asked what the "best" fit system or process is. Unfortunately this question circumvents the most key component of a good bicycle fit—how skilled or experienced the person performing the fit may be.
Advanced technology does not necessarily make for a better or more accurate fit any more than a heart rate monitor or power meter automates a better athlete. What is more important beyond the respective joint angles is that there is a feedback loop between the athlete and the fitter.
I find that too much technological integration can impede this at times or become a distraction.
There is a point of diminishing returns when it comes to fit technology or technology in general. The athlete can be overwhelmed with information that has little relevance to how the bike fit actually feels or performs off the fit platform. For the fit technician, over-reliance on a computerized process may keep the inexperienced fitter from seeing the forest for the trees.
It is more important to search for an experienced and trained fitter than it is to find the most advanced fit system. Fitting takes years of experience, but a computer program can be purchased by any shop or person. More importantly the fitter must properly evaluate and communicate adjustments to the athlete.
Fitting should be a dynamic and interactive process, and not rushed. The best fit that hits the proper joint angles precisely is still only a good starting point and will require the athlete to acclimate to or even require small adjustments post-fit.
I recommend the following criteria when choosing a fit professional and spending your dollars wisely:
Fitting is a process that requires acclimation. This may take some time, but if your position is painful or uncomfortable, it is not the right one. This not only affects performance, but also your motivation and enjoyment of cycling in general.
No one should have to ride in pain when it can be prevented or addressed.
Matt Russ has coached and trained athletes up to the professional level, domestically and internationally, for over 15 years. He currently holds the highest level of licensing by both USA Triathlon and USA Cycling, and is a licensed USA Track and Field Coach. Matt is Head Coach and owner of The Sport Factory, and coaches athletes of all levels full time. He is also a freelance author and his articles are regularly featured in a variety of magazines and websites. Visit www.thesportfactory.com for more information or email him at coachmatt@thesportfactory.com