Pages

Friday, December 31, 2010

Using the Mind to Heal the Body: Imagery for Injury Rehabilitation

Dryw Dworsky, Ph.D. & Vikki Krane, Ph.D.
Bowling Green State University 

from www.appliedsportspsyche.org

Being injured is no fun! Often it means that athletes and exercisers are in pain and they are not able to participate in the sport they love. Often when we think of being injured, it means that we need to wait for the body to heal. However, what if you learned that you might be able to speed up the healing process?
Research suggests that maintaining a positive attitude and using mental skills are related to a shorter rehabilitation. In fact, when Ievleva and Orlick (1999) compared slow and fast healers, they found that the fast healers:
  • took personal responsibility for healing
  • had high desire and determination
  • had more social support
  • maintained a positive attitude
  • used creative visualization
  • were less fearful of re-injury upon return to full participation
 The goal of this article is to introduce you to creative visualization and explain how you can use it to manage pain and complement your physical rehabilitation. First and foremost, you need to follow all instructions given by your doctor or therapist. Imagery is a skill you can use in addition to your physical rehabilitation exercises.
What is imagery?
  • Imagery is creating a mental likeness to something you would like to have occur in real life
  • Imagery involves using all of your senses to create or recreate an experience
  • Using imagery can:
    • increase feelings of personal control
    • break up the monotony of physical rehabilitation
    • potentially enhance rate of healing
Lessons from Cancer Research on Imagery
Research has shown that cancer patients who use imagery gain many benefits. These include:
  • increased coping with therapy
  • promoted involvement in self-care
  • improved mood
  • improved quality of life
  • increased sense of internal control
  • improve immune response
  • decreased post-op pain
  • decreased post-op anxiety
  • shortened hospital stays
  • decreased amount of pain meds
*Each of these benefits will assist individuals who are rehabilitating a sport or exercise injury

How to Use Imagery:
  • Relax (take a few deep breaths before beginning)
  • Close your eyes and create a vivid and convincing image
  • Maintain a positive attitude
  • Have realistic expectations (imagery can help, but don’t expect a miraculous or immediate recovery)
  • Use all of your senses to make the image as realistic as possible
  • If your imagery session is not going the way you want it to, stop and start over… always be in control
USING CREATIVE IMAGERY
There are many uses of creative imagery. Whatever your goals, you can create an image that you find helpful. In the following, strategies focusing on pain management and healing are described.
Pain Management Imagery
  • When our muscles are tense, pain often increases. So one way to reduce pain is to become more relaxed. Examples of relaxing images include:
  • imagine tight muscles getting massaged
  • see muscle fibers separating
  • concentrate on feelings of warmth
  • Sometimes it is helpful to distract yourself from thinking about pain. Some distracting images include:
    • being on the beach or floating in a pool
    • rehearsing sport skills
  • Some people associate a certain image with pain (e.g., the color red, sparks or bolts of light). Use imagery to reverse these images.
    • if red is associated with pain, image the sore body part turning a soothing pale blue
    • focus on the bright light getting dimmer
  • Additional examples of pain control images include:
    • feel heat/ice on sore body part
    • imagine swelling draining out of the body
    • imagine pain flowing out of the injured body part
    • if you have throbbing pain, image “pain bubbles” leaving the body with each beat
 Healing Imagery
  • A healing image is one that symbolizes recovery
  • It is an image that creates a mindset for healthy healing
  • To develop healing images, ask yourself:
    • What images do you associate with injury and/or pain?
    • What images do you associate with being strong, mobile, or healthy?
    • What images remind you of healing?
  • These images can be silly; remember that the image only needs to be meaningful to you.
 Examples of Healing Images include:
  • Broken bone: cement filling in a break in a bone
  • Torn muscle: muscle fibers braiding together
  • Swollen body part: “bad stuff” draining out of the body
  • Injured ligaments: ligaments getting thicker and stronger or tight muscles lengthening, stretching
A Sample Healing Imagery Script:
Take a few deep breaths … Concentrate on your breathing, feel the movements of your body … Just relax, sink into the chair/couch

Now focus your attention on your hurt knee … Notice what it feels like … See what it looks like, the swelling, bruising … Concentrate on reducing the swelling … Imagine a leak in your knee and see some of the fluid drain out … Concentrate on the swelling going down … See your knee returning the its normal size … Concentrate on the swelling going down … As your swelling reduces, notice your knee feeling more normal
Now turn your attention to feeling the knee getting stronger … See the ligaments coming together … Feel the ligaments getting tighter, growing together … Concentrate on the fibers getting bigger, stronger, tighter … Feel your knee getting stronger
Scan the muscles around the knee … Begin concentrating on your quad … Relax the muscle … Feel the muscle become loose and relaxed … To further relax the muscle imagine your quad being massaged … Feel the muscles being kneaded … Notice the relaxed feeling in your quad and all around your knee
Notice how your knee feels … concentrate on feeling relaxed … feeling stronger … You are getting better … enjoy the feeling

Thursday, December 30, 2010

3 Tips to Build Mental Toughness

By John Rarity
Active.com

As an endurance athlete, I’m sometimes asked where I find the most challenge during an event. Is it the swim portion, elbowing for room through a pandemonium of competitors? Is it the bike as I strive to maintain my pace through a series of hills, or is it the run, the final stretch?

Without hesitation, I always answer the mental game is where I find the most challenge and reward.

I have experimented with focused breathing exercises to relax my mind before an event. I’ve used some of these techniques to relax my body and limber before the starting line, as well as urge a shot of energy the moment my body wants to back down.

Yet, as an amateur athlete who’s gone from a complete newbie to placing in the top three in my age group, I’ve been unable to maintain gains beyond certain strength and stamina thresholds.

From consulting numerous nutritionists to incorporating a variety of strength training programs, these barriers have persisted. Had I reached certain impassable thresholds in my physiology, or were they perceived? Was there no way around them, or did I simply lack the key?

Six months ago I came across a camp designed specifically to challenge and enhance the physiology of mind and body. The Kokoro Camp (Japanese for warrior) put on by SEALFIT of Encinitas, California, has in a relatively short period of time become the world’s premiere camp for forging mental toughness.

Founded by former Navy SEAL Commander, Mark Divine, along with his core group of ex-Navy SEAL instructors, Kokoro is based off of the famous Navy SEALs Hell Week concept with an emphasis on teaching through experience, rather than a focus on attrition. Each camp participant is provided with the tools via field and classroom instruction to push the body and the mind way beyond previously perceived limits.

In my particular case, it set those limits on a hard cement floor and crushed them into powder beneath the weight of 50 hours of intense physical training.

The concept behind the camp can be broken down into three main components:

* Mental toughness
* Full spectrum functional fitness
* Self awareness

Mental Toughness

This means precisely what is says, lessons and practical advice on teaching how to toughen your mind. Does this mean push-ups and sit-ups for the mind? Yes and no. Yes, in that physical exercise is the vehicle used for forging this type of toughness. No, in that you can’t literally have your mind do push-ups…

So how does it work? Simple. One step at a time. Have you ever been in a workout or race and found yourself completely, 100%, without a doubt out of gas? Of course you have. So what did you do? Most of us probably eased off the throttle, while others stopped and took a breather completely.

Don’t focus on what’s left in your race... just focus on the next step.

Assuming you’re not training with any injuries and it’s the mental component we’re dealing with, this is where mental training proves extremely valuable. Don’t focus on what’s left in your race or workout, don’t even focus on those around you, just focus on the next step. One foot, one rep, one stroke after another. Incorporate focused breathing to relax and invigorate your body—then carry on.

Self-Awareness

One key lesson learned after participating in the Kokoro Camp is the fact that our bodies are capable of more—way more—than we give them credit. As a matter of fact, on the third day of this camp, I actually felt my pushups, running and squats getting stronger! But ask me to sit down, or get up from a chair—and I was moving at the speed of a centenarian.

Can you be pushed too far? I don’t know, let’s see. At one point, I was asked to hold the ready push-up position with my feet on a log. Fine. Then I was told to hold this position while raising my right leg in the air… fine. Then I was told to hold this position while a crew of six men crawled between me and the ground.

No longer able to hold my right foot in the air, it simply collapsed on top of my left. I glanced at my teammates and noticed most had done the same. When the body is maxed, it’s maxed. And the instructors at Kokoro, as with most elite training programs, understand that.

It isn’t your time or total reps that ultimately count—it is the fact that you put in 100%. You weren’t holding back. No plans for the future or memory of the past. You simply put out for the moment and found you had enough to take you the distance.

Instead of my mind being in charge and “teaching” my body a new exercise, my body taught my mind a few things. One of these was the fact that it is capable of much more, if my mind will simply let it do what it needs to do to take care of that moment. Rather than waste energy on what happened or will happen, the body will take care of what needs to happen now.

Full Spectrum Functional Fitness

At Kokoro Camp, emphasis is placed on the following key fitness components:

Strength. Aside from endless amounts of push-ups and squats, there was the functional aspect of strength development through bear crawls, duck walks, and running on the beach with a 25 pound rucksack strapped to your back.

Stamina. Each day challenged us to continue at a high rate, race after race and rep after rep for several hours at a time.

Work capacity. Your work capacity never diminishes. We finished doing the same intensity and number of exercises the last minute of the camp as we did the first minute.

Endurance. It seems to go hand in hand with stamina, and often did. Yet, it was distinctly tested during particular “evolutions,” as the varying events were called, that lasted for several hours at a time.

Durability. This extended to our physical and mental (don’t forget the two go hand-in-hand) durability. From jumping into 60 degree ocean water and performing flutter kicks on our backs to over an hour of pushups on a cement floor carrying 25 pound rucksacks. How did we rest between sets? Kneeling down.

And finally, there is little in your life you will find as rewarding and enduring as making it through a mentally and physically challenging experience that pushes you to new limits—akin to challenging one of the world’s tallest peaks or traversing a vast ocean or desert.

When you come out the other side and take a glance at who you once were, you understand. You know in the deepest corner of your being that you have reached new heights, surpassed self-imposed limits and are now a much better athlete, family member, co-worker and overall person.

Wednesday, December 29, 2010

6 Tips to Push Past the Pain

In 2006, Michelle Barton tackled California's Orange Curtain 100K, which is 10 circuits on a 10K out-and- back course. "It stank," says the 38- year-old from Laguna Niguel, California. "It was one of my most painful races—mentally and physically." But then, around mile 50, she had an epiphany: "If it's going to hurt, I want it to hurt for a reason." She dug in, pushed hard, and won the race in 10:24.

Elite runners often say that their ability to push through excruciating bouts of discomfort is integral to their race performance. "After you've built up your base mileage, it's really about how much pain you can take," says Barton, who once ran five 100-mile races within six weeks. "You have to reach into yourself and find that toughness."

As runners propel themselves forward, some measure of discomfort is normal (provided it's not a sign of a serious issue). Muscles burn. Joints ache. Exhaustion sets in. However, research suggests that our pain threshold is not set at an unmovable level—that the mind can, to some extent, control it. "When I tell an athlete that they can adjust their pain level by using mental techniques, they're amazed," says Raymond J. Petras, Ph. D., a sports psychologist in Scottsdale, Arizona. "They often find that their performance increases dramatically." The following mental tricks—recommended by sports psychologists and used by elite runners—will help you redefine your limits.

The Pain: Feeling Sick in Anticipation of a Run

Deal With It: Remember Your Strengths
Researchers at the University of Illinois recently reported that athletes who believed they could tolerate leg-muscle pain performed better in a running test than those who doubted their ability to withstand pain. "Think of all the other challenging workouts and races you've done to remind yourself of how strong and capable you are," says sports psychology consultant and marathoner Kay Porter, Ph. D., of Eugene, Oregon.

The Pain: Struggling Through Mile Repeats

Deal With It: Run With Purpose
Don't dwell on how much you hurt. Rather, focus on your rationale for training. "Tell yourself, 'I'm working this hard because...' and then fill in your performance goal," says Jim Taylor, Ph. D., a performance psychologist and sub-three-hour marathoner in San Francisco.

The Pain: Climbing a ?@*#! Mountain

Deal With it:Repeat a Mantra
"If you connect pain with a negative emotion, you'll feel more pain," says Taylor. "Connect it with a positive thought, and you'll feel less." Create a positive affirmation you can call upon during tough bouts. It worked for Matt Gabrielson, who repeated "Go!" and "Do this now!" while racing the 2008 USA Marathon Championship and the 2008 Twin Cities Marathon — he placed second at both.

The Pain: Hitting a Low

Deal With It: Know It Will Pass
Seasoned runners like Barton know that pain not related to an injury is often fleeting, and this knowledge is sometimes enough to help ride out the unpleasantness. "I learned that the pain comes and goes, and so at future races I was ready for it," she says. "I could take it because I knew what to expect." During difficult moments, put the pain in perspective. Remind yourself that the discomfort is temporary, and each step forward is one closer to the finish. Research has even shown that pain is often purely in your head and not an accurate signal of physical distress. Keeping this in mind will enable you to push through the discomfort so you can run faster or longer.

The Pain: Long-Run Fatigue

Deal With It: Think of the Payoff
"Don't get too emotionally involved with the pain or get upset when you feel it," Taylor says. "Detach yourself and simply use it as information." Ask yourself where the pain is and why it's happening. And if it's not related to an injury, then acknowledge that this could be an indication that what you're doing is going to help you reach your goal. "Some types of pain tell you that you're pushing yourself, that you're getting better," he says.

The Pain: Gutting out a Hard Patch

Deal With It: Distract Yourself
"Focus on something else while also staying in the moment," says Gabrielson. At mile 18 of the 2006 New York City Marathon, Gabrielson felt a pounding in his quadriceps. "I had to find a way to channel the pain," he says. His solution? As he ran, he studied the faces of the people on the sidelines. Most of them, he recalls, were smiling, cheering him on. Focusing on the pleasure of others around him was just enough to take the edge off and help him reach the finish line in 2:19:53.

Stop Right There

Running your best often means going all out, but certain pains are warning signs you shouldn't ignore.

Sharp, sudden foot, shin, or hip pain that worsens as you run
It's possible you have a stress fracture, says Heather Gillespie, M. D., a sports-medicine physician at UCLA. Take time oft from running and make an appointment for an x-ray.

Limping
This could be the result of a muscle or ligament tear. "Any pain that causes you to change your form should make you stop," says Lewis G. Maharam, M. D., medical director of the New York Road Runners.

Chest pain, extreme sweating, breathlessness
These are symptoms of a heart attack, says William Roberts, M. D., medical director of the Twin Cities Marathon.

High body temperature; dry skin; vomiting
This could be heatstroke, which can be life threatening, says Dr. Gillespie.

Severe stomach pain; diarrhea
These are signs of an intestinal problem called ischemic colitis, which tends to occur during prolonged exercise.

Nicole Falcone

Tuesday, December 28, 2010

Pain Tolerance in Sport

Eddie O’Connor, PhD, CC--AASP
Performance Excellence Center

from appliedsportspsych.com

Pain is ever-present in sport.  An athlete’s ability to tolerate pain is essential to success. Pain provides valuable information about your body and how it is performing.  To maximize its usefulness it is important to understand what kind of pain should be listened to and what type is helpful or safe to work through.

First, we must define the different types of pain you can experience:
  • Fatigue and discomfort.  This is an unpleasant feeling produced by effort, but not strong enough to be labeled “pain.”  Athletes learn to be “comfortable being uncomfortable,” as such efforts are a regular and necessary part of most sports.  With continued effort, discomfort can turn into …
  • Positive training pain.  This pain often occurs with endurance exercise, and includes muscle fatigue and sensations in the lungs and heart that can range from unpleasant to what is typically thought of as pain.  It is neither threatening nor a sign of injury. Because athletes know the cause, are in control of their effort, and recognize that these feelings are beneficial and can enhance performance.  In short, positive training pain is a good sign of effort and improvement.
  • Negative training pain is still not indicative of an injury, but goes beyond positive signs of training benefit.  An example may be extreme soreness that lasts for days.  There may be an overtraining risk.
  • Negative warning pain is similar to negative training pain, with the added element of threat.  It may be a new experience of pain and a sign of injury occurring.  It typically occurs gradually, and allows the athlete to evaluate potential training causes and respond appropriately.
  • Negative acute pain is an intense and specific pain that occurs suddenly, often a result of injury.  It is often localized to a specific body part and is labeled as threatening.
  • Numbness is rare but of very serious concern.  It is when the athlete feels nothing when soreness, fatigue or pain should be felt.  Instead, limbs are numb.  This may be a sign of serious injury or pushing one’s body past its physical limits.
We will focus on positive and negative training pain and save negative injury pains for another article. 

How you react to your pain is important. 

  • If you interpret your pain as threatening, or if you focus on the pain rather than concentrate on your sport, the pain will increase and interfere with your performance. 
  • On the other hand, if you view pain as something that is natural and necessary and interpret it as a sign that you are working hard and achieving your goals then your pain can be an ally. 
  • Many athletes find that recognizing that they are not alone in their pain is helpful.  The athletes playing with them also hurt, and the challenge of tolerating your pain may add to the competition.  In addition, athletes often report great satisfaction after persevering through a painful training session or competition.
Accepting the reality that pain is a part of training and competition may be most helpful.  You cannot perform at a high level and not experience pain.  Comfort and performance excellence are mutually exclusive.  You cannot have them both.  Prior to exercise, decide how much pain you are willing to experience to achieve your goals.  When pain shows up, be willing to feel it fully as part of your experience.  Let your pain be in service of your greater goal.  You may be surprised to find your pain suffering will be lessened when you allow pain to be a part of sport.

More on injury and rehabilitation pain at a later date (you are not advised to push through injury pain) … but until then, “Be willing.”
References
  1. Addison, T., Kremer, J., & Bell, R. (1998). Understanding the psychology of pain in sport. Irish Journal of Psychology, 19, 486-503.
  2. Taylor, J., & Schneider, T. (2005). The triathlete’s guide to mental training. Boulder, CO: VeloPress.

Monday, December 27, 2010

Sport Imagery Training

From Applied Sports Psychocology

What is imagery?
  • Imagery is also called visualization or mental rehearsal
  • Imagery means using all of your senses (e.g., see, feel, hear, taste, smell) to rehearse your sport in your mind.
Why should you use imagery?
  1. To help you get the most out of training. Top athletes use imagery extensively to build on their strengths and help eliminate their weaknesses.
  2. To compete more effectively. Imagery not only helps athletes to regulate the anxiety they experience during competitions, but also helps athletes to stay confident, focused and mentally tough.
  3. To speed up your progress on the road to top. Athletes who have reached the highest levels in their sport have used imagery throughout their career as a tool for developing their sport skills.
  4. To help stay motivated along the way. Imagery is also a tool that can help athletes to maintain a vision of what they would like to achieve in their sport. Athletes can also use imagery to assist them in setting their daily goals, as well as to stay motivated during tough training sessions.
  5. To keep in top form when training is not possible. Injuries will inevitably occur during athletes' careers, which will cause them to miss training sessions. In these situations, athletes can use imagery to help them to maintain their abilities during the rehabilitation process and to help them cope with their injuries. Imagery can even help the healing process to move along more quickly.
How do the best athletes use imagery?
From studying how the best athletes use imagery, we know that imagery is most beneficial when it is:
  • Vivid and detailed
  • Incorporates all senses (see, feel, hear, smell, and taste)
  • Occurs in "real-time"
  • Has positive focus
Tips for getting started
  1. Practice makes perfect. Imagery is a skill, and, just like any skill that you perform in your sport, you will need to practice in order to be perfected.
  2. Quality... not quantity. Because imagery is a mental skill, you will need to concentrate on creating and controlling your images, which can be tiring when you first get started. For this reason, it is best to begin your imagery training by imaging high quality images for short periods of time, and then gradually increasing the time you spend imaging.
  3. Set the scene. Try to make your imagery as realistic as possible by re-creating important details of your sport setting (e.g., practice and competition venues) in your mind's eye. By including details like the color of your opponent's uniform or the sound of the spectators' cheering, you will feel like you are really experiencing the performance that you are imaging.
  4. Plan your imagery. Images of your sport can frequently pop into your head, but to really benefit from imagery, you should plan the content of your imagery to meet your current needs. Here are just some examples:
    1. If you are struggling to perform a certain skill or strategy in game situations, you should try imaging yourself performing that skill or strategy perfectly and confidently in an upcoming game.
    2. If you often let distractions get in the way, try imaging yourself staying relaxed and focused in the presence of those distractions.
    3. If you have problems handling your nerves in competition, try to imagine yourself performing exactly the way you want to under those conditions that normally would make you nervous.

Sunday, December 26, 2010

3 Medicine Ball Workouts to Build Your Core

Bicycling magazine


Barbells and dumbbells are fine to pump up your muscles, but if you want what fitness freaks call core strength—the kind that makes your whole body strong from abs to fingertips—it's time to get some balls.
Medicine balls are making a big comeback in athletic training, and with good reason.

Because they involve twisting, turning and bending, medicine ball workouts train all the supporting muscles that don't get stressed during traditional strength-training exercises.

They also tend to use full-body movements, instead of just an arm or a leg curl, so they're unbeatable for increasing your core, or trunk, strength.

The better your core strength, the better you're able to transfer power through your body to your pedals. Plus, strong back and ab muscles help you ride longer without fatigue.


Medicine balls really work your central nervous system and connective tissues, so take the movements slow and easy when you start the exercises.

1. Downward Chop

Stand with feet shoulder-width apart. Hold the ball behind your head, and then swing it down between your legs as if chopping wood. (Bend your knees slightly as you come down, as you would if you were hiking a football between your legs.)

Then swing it back up behind your head, straightening your body as you lift up. Start at a slow pace. Work up speed as you advance.

2. Squat and Toss

Stand with feet spread about shoulder-width apart, knees slightly bent, upper body straight. Hold the ball at your chest. Squat down and then extend your legs up, throwing the ball directly overhead. (Not too high.)
Catch the ball, giving with your wrists and elbows to absorb the impact. Bring ball back to chest and repeat.

3. Side Chop

Kneel with knees spread about shoulder-width apart. Hold ball with both hands above your left shoulder. Bring the ball across your body and down to the outside of your right knee. Bring it back across your body to the starting position. Do a full set on each side.

For All Exercises:

  • 10 reps on each set
  •  
  • Start with one set, work up to two
  •  
  • Use a 6- or 8-pound medicine ball
  •  
  • Do this two days per week

Friday, December 24, 2010

8 Pilates Exercises for a Tighter Tummy

You've probably read about celebs extolling the virtues of Pilates (lean legs, a supertaut tummy), or maybe even heard the hype from mat-class-obsessed friends. If you're still skeptical, keep reading: "Pilates puts your muscles—especially the smaller, stabilizing ones—under constant tension over a large range of motion to create that enviable long, lean look," says Lauren Piskin, owner of Physicalmind Studio in New York City. What's more, one study found that women who swapped their usual routines for two 60-minute Pilates sessions a week saw significant increases in abdominal endurance, hamstring flexibility, and upper-body muscular endurance.

Problem is, these perks often come with a hefty price tag: A few sessions a week (typically using a bed-size contraption called a Reformer) can set you back hundreds of dollars. So Piskin created this at-home total-body workout, which gives your abs some extra love without damaging your bottom line. All you need is a Pilates ball. "The ball mimics the resistance of the machine to challenge your muscles as you move through fluid movements," says Piskin. Do the following sequence two or three times a week. Starting with the first move, do eight to 10 reps of each exercise with little to no rest between exercises.


Mermaid with Ball


Sit with the ball at your left side, and bend your left leg in front of you, your right leg behind you. Place your left hand on the ball, elbow slightly bent, and extend your right arm out to your side at shoulder level (a). Brace your core and roll the ball out to the left as far as you can while reaching your right arm over your head (b). Hold for two or three seconds, then roll the ball back toward your body and return to the starting position. That's one rep. Finish all reps, then switch sides and repeat.

Rollover


Lie faceup on the floor or an exercise mat with your arms at your sides, palms down, legs straight. Lift your legs until they're perpendicular to the floor, feet flexed (a). Keeping your shoulders relaxed and legs straight, brace your core and raise your hips, slowly reaching your legs behind your head as far as you possibly can and pointing your toes behind you (b). Slowly reverse the movement to return to start. That's one rep.

Footwork on Ball


Lie faceup, arms by your sides, palms facing down. Bend your knees and place the balls of your feet on top of the ball, heels together and toes pointing slightly outward in a small V shape (a). Engage your core and contract your glutes to lift your hips an inch off the floor, then roll the ball away from you until your heels are on the ball (b). Pause, then bend your knees to roll the ball back to the starting position. That's one rep.

Swan on Ball


Lie facedown with your legs extended shoulder-width apart behind you. Position the ball under your chest and rest your forearms on the floor, palms down, elbows close to your body (a). Bring your shoulder blades back and down, press your palms lightly on the floor, and slowly lift your head and chest as you lengthen your spine (b). Hold for two or three seconds (imagine trying to create as much space between your ears and toes as possible), then return to the starting position. That's one rep.

Back Arm Rowing

Sit with your knees bent and feet flat on the floor about hip-width apart. Extend your arms straight in front of you, palms up. Your back should be straight, your chest up (a). Brace your core, curl your tailbone under, and slowly lower your upper body to a 45-degree angle. At the same time, bend your arms to bring your elbows close to your body, closing your hands into fists and pulling them toward your shoulders at eye level (b). Pause, then reverse the motion to return to start. That's one rep.

Mermaid with Twist


Sit on your left hip with your left leg flat on the floor, knee bent 90 degrees, and your left palm on the floor. Bend your right knee toward the ceiling and place your right foot flat on the floor in front of your left foot; rest your right arm on your right knee (a). Shift your weight onto your left arm and straighten both legs to raise your hips toward the ceiling while extending your right arm directly over your head (b). From this position, twist your torso down and to the left, reaching your right arm underneath your body (c). Reverse the movement to return to the starting position. That's one rep. Finish all reps on that side, then switch sides and repeat.

Roll Back and Up


Sit with your legs extended straight out in front of you, feet flexed. Hold the ball in front of you at shoulder level, arms straight. Keep your chest up and back straight (a). Contract your core and glutes, then slowly roll back until your back is flat on the floor and the ball is directly overhead (b). From that position, bring your chin to your chest and slowly roll back up to the starting position. That's one rep.

Coordination with Ball


Lie faceup with your hips and knees bent 90 degrees; hold the ball with both hands, arms straight. Bend your elbows and lower the ball toward your chest, pressing your hands firmly against the ball (a). Brace your abs, extend your arms in front of you, curl your shoulders off the floor, and straighten your legs (b). Hold for one or two seconds, then reverse to return to start. That's one rep.

Thursday, December 23, 2010

5 Reasons to Strengthen Your Core

Strengthening your core (the muscles from your hips to your shoulders) is like giving yourself a full-body makeover: You'll feel smarter, younger, and better all over. Mark Verstegen, author of Core Performance (Rodale 2004), makes the case for a hard core workout.  [This is a great book BTW - L]

1. It Reduces And Prevents Pain
"A strong core stabilizes you and works like a natural brace for your joints."

2. It Makes You Look Taller and Thinner
"When you strengthen your upper back and shoulders, the muscles are pulled back and down, removing any trace of a hunch."

3. It Delays the Aging Process
"A strong core keeps your body aligned, so that you can function properly."

4. It Improves Mental Function
"Having a stable and aligned spine allows your brain to receive your body's messages more efficiently."

5. It Improves Performance
"Stabilizing your core hones your fine motor skills, so you can react quickly and stay balanced on unstable surfaces."

Pilates: The Core Builder These three Pilates exercises from Michelle Dozois of Breakthru Fitness Pilates in Pasadena, California, will work your core from all angles.

Double-Leg Stretch


Lie with knees and hips bent 90 degrees, shoulders off the floor, hands on shins. Pull your abs in and flat, extend legs and arms to 45 degrees, and circle your arms. Repeat 10 times.

Side-Lying Double-Leg Lift


Lie on your side with legs stacked, head on bottom arm, top arm on the floor. Squeeze legs together and lift off the floor. Hold for a breath, return to start. Do 10 reps, switch sides.

Reverse Plank with Leg Raise


Sit with legs outstretched, hands behind your butt, fingers forward. Press onto your hands, and lift your right leg, keeping hips raised. Hold 3 seconds. Repeat 5 times for each leg


Photos by Darryl Estrine

Wednesday, December 22, 2010

Smart Fitness: Work on Your Core Strength

Ed Fitzsimmons
Buffalo News
from active.com

The phrase "core strength" is heard often around health clubs these days. Just what is it?
 
Core strength is not just strong stomach muscles. True core strength is the ability of the "middle" of the body to hold correct posture, maintain balance, have a strong awareness of body and limbs in space and the functional strength to properly use it all.

The muscles of the core and trunk must learn and possess the strength to pull against each other, creating a strong and stable base. This base allows the limbs a stable platform to work from. With a stronger core, the legs and arms and will have more strength and power to perform smoother and with less chance of injury.
The absence of this core strength is the precursor to the increasing number and severity of "non-contact" knee and shoulder injuries. In order to obtain this functional core/trunk strength you must first train movements, then add strength. If too much weight is applied early, the motions are learned and strengthened incorrectly.
Training is the process of teaching the muscles and groups of muscles to be bio-mechanically correct in their motions. Then slowly strengthen the muscles and the movements together, allowing and enhancing proper movements.

Core Exercises 
Two good exercise examples for strengthening the core are "Chops" and "Lunges." Chops mimic the actions of chopping wood. When performing Chops, keep the chest up and knees slightly bent, chop to the right left and center.

Lunges are performed with the chest and upper torso upright. Step comfortably forward with one leg and bend the knees. The back knee will continue to flex and move straight down until just above the floor. Stop and recover if the torso begins to flex forward. Keep the effort distributed mostly on the back half of the front foot.

Keeping the chest up is critical to bring in the core/trunk muscles to train their correct involvement.

Progression

The process is initiated by using body weight or less to begin the training. Examples are squatting with only a stick on the shoulders or using a leg press machine to push less than your own body weight. Next some light implements such as the medicine ball, light bars and dumb bells can be used.

When movements and muscle comfort are good, a balance component will be increased, not the weight. This makes the body include the very important joint stabilizing muscles, mimicking sports activities.

The last aspect is to significantly strengthen the muscle movements and keep the muscles being used in the lifting activity. By incorporating and combining many movements together in lifting patterns, larger weights or more complicated positions can be used because the entire body is being called on to work.

These higher level lifts are called multi-joint lifts. These sequenced, patterned lifts keep the core strong, the body functionally strong and safer in activities.

Suggested Routine

Here is a suggested routine to begin to trigger functional core/trunk strength gains:

Using the two exercises explained earlier start with one set of five to seven reps. You can progress and increase the difficulty, safely and effectively in one of four ways. Never change more than one factor at the same time:
1. Increase the number of reps in your set (stop at 15).
2. Increase the number of sets (stop at four).
3. Exercise on a softer surface such as an exercise mat.
4. Add weight to hold in your hands, very small weight -- one pound to three pounds -- and add very slowly.

The program should be done every other day. Always check with your doctor before starting any exercise program.

Ed Fitzsimmons is functional conditioning specialist with the University at Buffalo Athletics-Sports Performance. E-mail fitness questions to m_adesso@hotmail.com.

Monday, December 20, 2010

3 Advanced Core Exercises For Killer Abs

A little late, but this week I've decided to post on core exercises...

By Kisar S. Dhillon
For Active.com 


There is not a day that passes that I do not see an infomercial or someone at the gym that is doing an abdominal exercise or expressing to someone that they want sculpted and defined abs.

Along with a very good diet, it is possible to get that lean look that everyone desires, but you can't just do the same old crunches and sit-ups that you see on television or in magazines. In order for your body to get the results you strongly desire, it needs to be surprised constantly with new and stimulating exercises.

I have outlined three different exercises below that you can add to your abdominal and core (Transverse Abdominus -- TA) routine. These are more advanced type movements that are targeted to work your core, abdominals, lower legs and hip region.

In order to do these exercises you have to be at an intermediate to advance fitness level and not be suffering from any muscle injuries (e.g. lower back area). If you are, then I would recommend not doing these exercises until your body is fully recovered or you're cleared by your physician.

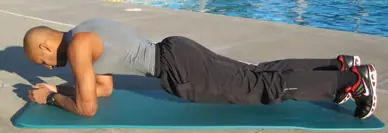
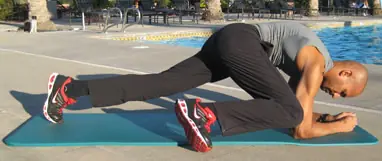
OBLIQUE PLANK CRUNCH

Targets: Entire Core (TA), Oblique Muscles, Hip Flexors, Abductors  


fitness
fitness
Steps:
  1. Go into a full plank on your forearms
  2. Bring your Right knee and try to touch the back side of your right arm (triceps area) and then back
  3. Bring your Left knee and try to touch the back side of your left arm (triceps area) and then back
  4. Do 3 sets of 30 reps/side (a total of 60 reps/set)
  5. Count your repetitions underneath your breath so are constantly having air exchange.

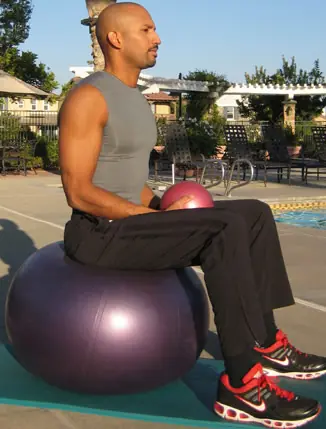
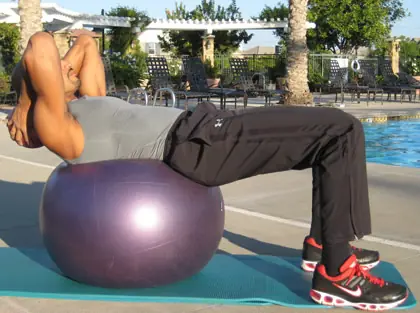
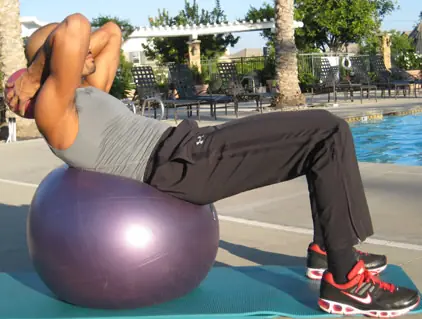
STABILITY BALL CRUNCH W/10LB BALL

Targets: Abdominal Muscles, TA Muscles, Triceps (Isometric), Lower Leg Muscles (for Stability);
fitness
fitness
fitness
Steps:
  1. Roll your back on the stability so that your lower back is in the middle portion of the ball. If this hurts your lower back or makes it tight, you can lower it down further until it feels comfortable.
  2. Place the 10 lb (or less) behind your neck and support it with your hands so it is nice and comfortable.
  3. Do a small abdominal crunch so that it flexes enough to activate the abdominal/core muscles, but do not come all the way up. You only need a small amount of flexion in this abdominal area and then release & repeat.
  4. Do 3 sets of 30 reps (a total of 60 reps/set)
  5. Count your repetitions underneath your breath so are constantly having air exchange.

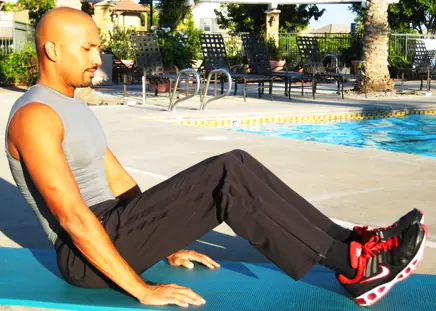
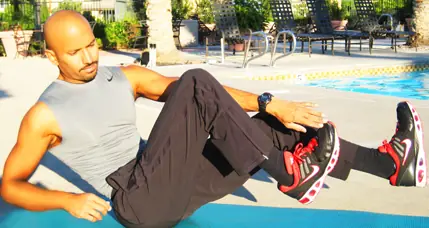
BALANCED CRUNCH W/HIP FLEXION

Targets: Abdominal Muscles, Core Muscles (TA)
fitness
fitness
Steps:
  1. Start out by sitting on your bottom with your legs slightly bent in front of you.
  2. Bend your legs so they are at a 45 degree angle and lift them off the ground.
  3. With your Left Hand Touch your Right Toe and then alternate to the other side
  4. With your Right Hand Touch your Left Toe and then alternate to the other side
  5. Do 3 sets of 30 reps/side (a total of 60 reps/set)
  6. Count your repetitions underneath your breath so are constantly having air exchange.


Kisar Dhillon is a professional fitness trainer living in Orange County, California. He holds a Bachelor of Science Degree in Kinesiology, Post Baccalaureate Studies in Exercise Physiology and a Masters in Business Administration. He has more than 16 years in the health & fitness industry and is currently the owner of 1-2-1 Fitness, LLC.

Sunday, December 19, 2010

Balance Your Blades: 3 Corrective Shoulder Exercises

By Matt Fitzgerald
Triathlete magazine

Any good orthopedist or physical therapist knows pain in one part of the body is often caused by dysfunction in another part of the body. The most common area of pain in swimmers is the shoulder rotator cuff.
Swimmer's shoulder is a form of bursitis that develops when a bursa, or fluid sack, located at the shoulder rotator cuff is repeatedly impinged during the swim stroke and becomes inflamed. Repetitive impingement may also cause tendonitis (inflammation) or tendinosis (tissue degeneration) in the tendons of the rotator cuff.
The primary cause of swimmer's shoulder is not the rotator cuff, however; it's the scapula. Commonly known as the shoulder blades, the left and right scapulae are strategically positioned as critical links between the spine and the shoulder rotator cuffs.

Essentially, the scapulae and the 17 muscles around them are the foundation of your shoulders and the base of every arm movement. A healthy shoulder blade must be both stable and mobile. Lack of adequate stability or mobility in the shoulder blade makes the rotator cuff susceptible to impingement during overhead arm movements such as those involved in the freestyle swim stroke.

Posture Problems

Healthy shoulder blades are a rarity in our society. The problem is the amount of time we spend sitting in front of computers and steering wheels. The hunched position we tend to assume in these situations leads to a more or less permanent forward rounding of the upper spine, called kyphosis.

This posture inhibits the ability of the scapula to tilt backward and create space for the rotator cuff in the shoulder joint when the arm is lifted overhead. As a result, the rotator cuff gets pinched, causing tissue damage.

It doesn't stop there. In the keyboard-typing and steering-wheel-grasping positions our shoulders are internally rotated and protracted (pushed forward) for long periods of time. This leads to laxity and weakness in the muscles that externally rotate and retract (pull back) the shoulders.

Eventually, these imbalances cause the shoulder blades to float away from the spine toward the shoulder sockets, a phenomenon known as scapular winging. A healthy shoulder blade is sucked up tight against the ribcage. If your shoulder blades are visibly poking out of your upper back when you stand with your arms at your sides, then you have scapular winging.

Swimming tends to exacerbate these issues further, while also hastening and intensifying their consequences. Swimming strengthens the shoulder's internal rotators and protractors at the expense of the muscles that move the shoulders in the opposite directions.

To improve your shoulder health and performance, it's necessary to counterbalance these effects with strengthening exercises for the muscles that externally rotate the arms at the shoulder socket and retract the shoulder blades. A little bit of corrective exercise for the shoulders goes a long way.

I recommend doing one set of each of the following three exercises twice per week as a preventive measure if you have never experienced swimmer's shoulder. Build to two sets of each exercise three times per week if you have had a shoulder injury.

(Thanks to Eric Cressey, M.S., C.S.C.S., a Boston-based strength and conditioning coach who works with endurance athletes including Dede Griesbauer, second at Ironman Brazil this year, for teaching me these exercises.)

Scapular Push-up

The scapular push-up strengthens the serratus anterior, a muscle that essentially holds the shoulder blade tight to the rib cage to prevent scapular winging. It's a crucial muscle for optimal shoulder stability.
Scapular Push-Up
Assume a standard push-up position. Keeping your elbows locked, retract the shoulder blades so your torso sinks a couple of inches toward the floor. Now protract your shoulder blades fully, so your upper back takes on a slightly hunched look. Return to the starting position, and repeat 10 to 12 times.
Scapular Push-Up

Behind-the-Neck Band Pull-Apart

This exercise strengthens the lower trapezius muscles, which are very important for adequate scapular upward rotation and overall shoulder health.
Stand with your arms extended straight overhead and grasp a short resistance band with your hands at shoulder width and palms facing forward. By pulling the shoulder blades back and down and flexing the elbows, lower the band to a position behind your neck. The band will stretch several inches as this action is performed.
Pull Apart
You'll feel the effort in the muscles at the base of your shoulder blades. Do not let your chin protrude forward; keep it tucked. Pause briefly with the band behind your neck and return to the starting position. Repeat 10 to 12 times.

Overhead External Shoulder Rotation

This exercise strengthens the shoulder external rotators, enhancing shoulder stability during the performance of overhead arm actions.
Stand with your right upper arm extended away from your body at shoulder level, your elbow bent 90 degrees and your shoulder rotated internally so your forearm is pointing toward the floor (in line with your body). Hold a small dumbbell (three to five pounds) in your right hand.
Shoulder Rotation
Rotate your shoulder externally 180 degrees, stopping when your right forearm is pointing toward the ceiling. Return to the starting position. Complete 10 repetitions and repeat the exercise with your left arm.

Active Expert Matt Fitzgerald is the author of several books on triathlon and running, including Brain Training for Runners, Runner's World Performance Nutrition for Runners (Rodale, 2005) and Triathlete Magazine's Essential Week-by-Week Training Guide (Warner, 2006).
All Photos by John Segesta/wahoomedia.com

Saturday, December 18, 2010

Weird Words That Will Make You Swim Faster

From TrainingPeaks

by Ben Greenfield
As you’ve probably realized, your IQ drops when you exercise, and nowhere is this more true than when you’re trying to swim faster. So while reading a treatise on the biomechanics of a proper swim stroke may be simple when you’re sitting at the kitchen table, once you’ve jumped in the water and are huffing and puffing, you can barely remember anything you read or learned.

This is where some weird words come in handy. I’ve created a few simple phrases that I can learn the meaning of when I’m outside the pool, then, then when I’m swimming, I can simply pull these phrases into my head without having to focus too much on big sentence and paragraph-based swimming cues.

So, without further ado, here are weird words that will make you swim faster!

Swim Faster #1 - Press Lung: Ideal buoyancy in the water is achieved when the lungs, your body’s natural life preservers, are pressed down towards the bottom of the pool. This is the foundation of downhill swimming and the position that allows for a more streamlined body. Think of your body as a teeter-totter, with the hips as the fulcrum. Pressing the lungs down brings the legs up, and vice versa. If the legs are down, they simply act as anchors, producing drag against the water that slows the rest of the body. Whether in the front or side swimming positions, always focus on pressing the lungs down towards the bottom of the pool. Once this becomes natural, you’ll conserve enormous amounts of energy and see massive increases in speed.
Swimming Tips

Swim Faster #2 - Brush Thumb: A proper and full stroke should bring the thumb to brush against the thigh at the end of the pull phase. Too many swimmers cut their pull short, for the simple reason that it makes swimming easier. I guarantee that if you practice a full pull phase, you will feel horrible during your first few swims and the muscles will be completely fatigued by the end of the swim. After practicing for a few weeks, however, your body will adapt and your speed will skyrocket. One of the keys is to achieve the thumb against thigh position by using the powerful lat muscles underneath the armpits, not the relatively weaker biceps and forearm.

Swim Faster #3Boil Feet: The feet should be “boiling”, just below the surface of the water. Feet that are submerged far below the surface are simply acting as drag-producing anchors, while feet that kick and splash above the surface are wasting too much time kicking in the air. We all know that the air produces no resistance, so this is wasted energy. Think about making tiny bubbles with the feet as you kick. While triathletes should not be wasting precious muscle glycogen stores in the legs during the swim portion of the race, a low-medium effort kick will be enough to keep those foot-anchors up.

Swim Faster #4 - Hide Head: If you are in a proper downhill swimming position, just a sliver of the head will show against the water. As you practice “Press Lung”, a natural consequence should be that the head “hides” below the water. If your head/torso unit is high, your feet will drop. Once again, buoyancy is a crucial key to efficient swimming.

Swim Faster #5 - Puppet Elbow: Imagine that your elbow is attached to a puppet string that is pulling it straight out of the water in the recovery phase of the stroke. A full elbow recovery is very important, especially in choppy, open-water swimming, where a partially submerged arm in the recovery phase will quickly tire you out because of increased drag.

Swim Faster #6Cigar Mouth: For a streamlined breathing pattern, attempt to take as little of the head as possible out of the water when breathing. The best way to think about this is “smoking a cigar” when you inhale, meaning, for you healthy, non-smoking triathletes, that the breath only comes from the outside corner of the mouth while the inside corner of the mouth is under the water. As you learn this breathing method, you may end up swallowing a bit of water, but long term practice will result in more efficient swimming.
Swimming image 

Swim Faster #7 - Raise Pinky: To achieve optimum pull against the water with the hand, while still maintaining a drag-free slice through the water, the pinky should be elevated higher than the rest of the fingers during the entire stroke phase. Every hand is different, so experiment with the outwardly turned angle of the hand until you find a position that gives you the most speed. One of the common mistakes I see when the pinky is elevated is a completely locked out elbow. Never completely straighten the arm when reaching towards the end of the pool because you’ll be able to grab less water to pull against.

Swim Faster #8 - Wall Reach: “Reach Over a Wall”, “Spear a Fish”, “Take a Cookie From the Jar” – there are many ways to describe how your hand should feel as it enters the water, but the general idea is that you are grabbing as big a handful of water as possible when initiating the pull phase of the stroke. If your elbow was correctly drawn out of the water, this will result in a more vertical entry of the hand/forearm unit. Remember, the forearm creates pull against the water in the same way as the hand, so make sure to use it by keeping the elbow slightly bent as you reach over the wall.


If you found these swimming faster tips and cues helpful, then be sure to check out Ben’s online triathlon training plans, at http://tinyurl.com/tpplans, where there’s even more practical tips just like this, along with videos and more! 

Thursday, December 16, 2010

Exercises to Prevent Swimmer's Shoulder

By Jen Adley
For Active.com 

 
Swimmer's shoulder is an inflammatory condition caused by the impingement of soft tissue between two bones that meet in the shoulder. Repetitive overhead arm motion of the freestyle stroke can cause this overuse injury, but there are ways to prevent it.

Strengthening shoulder and upper-back muscles and stretching shoulder, chest and neck muscles will help to prevent a swimming posture that is more susceptible to injury. The muscle imbalance and inflexibility that typically occurs in swimmers contributes greatly to impingement. The following exercises and stretches specifically address these areas.

Shoulder Stability
The external rotators of the rotator cuff muscles play a crucial role in shoulder stability. These muscles are also inherently weak and are often the cause of rotator cuff impingement. By strengthening this group you will have a more stable shoulder joint.
ShoulderRotatorExercises
Using a stretch cord or cable, hold your arm so your bicep is parallel to the ground and your elbow is bent at a 90 degree angle. Pull your hand forward until your forearm is parallel with your bicep, making sure not to move your elbow.
You can also do this with a dumbbell, resting your elbow on a bent knee and rotating your forearm up and down at a 90 degree angle.

Balancing Out
This exercise promotes stability in the scapular region and prevents muscle imbalance associated with swimming. These muscles promote postural alignment and aid in shoulder stability. In swimmers they often become lengthened.
Lie face down on an exercise ball. Holding a barbell with both hands, raise it until your arms are outstretched in front of you. Remember to keep your back straight.

Building a Neutral Shoulder
This exercise strengthens the rear deltoid and mid-back. Swimmers often have shortened pectorals and front deltoids, causing a shoulder joint that internally rotates. By strengthening the muscles of the back and rear deltoid you maintain a more neutral shoulder.
Leaning face-forward on an incline, hold a dumbbell in each hand and raise them up past your body. Keep your arms straight.


Flexibility Options
These stretches address tightness and shortening in the shoulder, chest and back that arises from swimming. A tight shoulder capsule will prevent proper reach and form in the water. Hold each stretch for about 30 seconds. You may progressively increase the stretch slightly every 10 seconds (within the 30 seconds).
ShoulderExercisesStretches ShoulderStretche2

Swimmer's shoulder may primarily be prevented by using proper freestyle stroke. The hand should enter the water with the tips of the fingers first and the palm facing downward. When the hand enters the water it should not cross the middle of the body. For further stroke instruction, seek the advice of an experienced swimming coach.

Jen Adley earned her BS in Biology and a Masters degree in Physical Therapy. She is a practicing board certified physical therapist for Body Pros Physical Therapy and is coaches athletes for The Sport Factory. She is licensed by USA Triathlon and USA swimming with over 10 years coaching experience. Jen has three times received an honorable mention ranking from USA Triathlon. Visit www.thesportfactory.com to learn more about Jen or email her at coachjen@sportfactory.com.

Wednesday, December 15, 2010

Swim Drills vs. Swim Volume

by Mike Ricci
For Active.com
 
Lately there's been a lot of fuss over swim drills. People have been saying that swim drills are the hot new thing on the market. New? They've been around for decades. When I was coaching high school swimming in 1989, we were doing drills daily. Every workout had a drill set in it, even if it was only a 500-yard, weak-side breathing swim.

Swim gloves for fist drills? These gadgets are unnecessary. Get a tennis ball, hold it in your hand and start swimming--now that's a real fist drill. I've coached athletes who've started from scratch and those with college swim backgrounds; both practice swim drills. Swim drills are important and I practice drills three out of every four times I get in the water, just to refine my stroke. I've been doing this for years.

When volume makes more sense than drills

Here's the problem: Unless you have someone watching you, to keep an eye on form, the drills can do more harm than good. Swim drills are helpful, but there's a point of diminishing returns. In my opinion, there's a point or pace where swim volume might make a lot more sense than drills.

So what is that point? Some coaches would tell you that it's about 1:50 per 100-meter pace, and I would agree for the most part. That would give you around 1:10 for an Ironman-length swim, 35:00 for a half IM, or 26:00 for an Olympic-distance race. If you're slower than that, you should focus more on swim drills.

There's no doubt that drills have their place, but if you want to get faster you need to swim more. More than you're currently doing and more than you think you should. I spent an entire winter swimming more than I ever have. I had a few of my experienced Ironman athletes do the same thing. We all became better swimmers.

Could we have accomplished this by swimming drills day after day? No way.

How do I know? We tried that and it didn't work. Like I said above, UNLESS you have a qualified swim coach (someone with swim coaching experience -- not someone who read a how-to book on swimming, like your cousin Dwight) watch you do the drills, then you don't know if you're doing them correctly.

If you have someone standing over you with a video camera recording your workouts and you then analyze your technique after each workout, then sure, it'll work to a point. But the fact is, most people don't do the drills correctly.

The more you swim, the better you get

Which brings us back to volume: The more you swim, the more adaptive you become and the better your feel of the water becomes. It's just like riding your bike downhill; you learn how to lean into a turn, how to accelerate out of turn, etc.

Swimming is the same way. The more your hand enters the water and you get your forearm over the barrel, the better you'll know what it feels like to 'grab' water and pull yourself through it. The more times you get in the water, the more natural it becomes.

Take two swimmers of the same ability and have one swim a volume approach and the other swim one drill after another; the volume-based swimmer will win the race in the long run.

Next time you swim ...

Tips for increasing your swim volume:
  • Swim sets steady, not fast. This means swimming with a good clean stroke, without rushing.
  • More swim volume equals more aerobic base. This means you have more fitness.
  • The more fit you are as a swimmer, the better you'll feel on the bike and run.
  • A 1,500-meter race will seem like nothing compared to that big swim set you did.
  • More swim strokes means more times to look at your stroke and see what you're doing wrong/right.
  • Think about your stroke on every entry, catch, pull and finish.
  • Do your drills in the middle of your 4,000-yard workout, don't make them your entire 1,500-yard workout.
  • Do your volume swimming in the winter when you can't bike as much OR when you're injured.
  • Injury problems: Too much swim volume can lead to shoulder/back issues, so be careful!
  • If you want to get to the front of your age group, you need to get out of the water in the front.
Essential drills to do every time you're in the water:
  1. Fist drill - swim four strokes closed fist, four strokes open palm
  2. One-arm drill - literally, watch your catch and pull while swimming with one arm.
  3. Heads up swim, underwater recovery, AKA doggie paddle - Focus on the catch, nothing more.
  4. Swim golf - More of a swim set to figure out your optimal strokes per length. Swim 50 yards (two lengths) and count your strokes and your time. Add the two together and you have your golf 'score.' If it takes you 50 strokes and the swim took you 50 seconds, then your score is 100. The lower your score, the more efficient you're becoming.
  5. However, BEWARE, once you start learning how to manipulate the golf score you could end up digressing. I see swimmers all the time who try to swim 28 strokes, and have a swim time of 50 seconds (78 golf score). They'd be much better off swimming 34 strokes, with a 44 second swim (78 gold score). Personally, I'd give up strokes for speed on most days. Yes, I'm swimming more strokes, but don't I want to get there faster? Isn't that the point?
So, if you want to improve your swimming (and who doesn't?) and you can swim 1,500 meters faster than 26:00, then consider swimming more volume. You can focus on drills every time you swim, but if you really want to swim fast, you need to improve your endurance, and the only way to do that is to swim more. More than you think you should, and more than you think you can.


Mike Ricci, D3 Multisport head coach and USA Triathlon Level III Certified Coach, was selected to write the training programs for both the short and long course USA World Championship Teams from 2002-2005. D3 Multisport has a variety of services ranging from one-on-one coaching to training plans for specific events and races. Visit www.D3Multisport.com for more information or e-mail Mike at mike@d3multisport.com.

Monday, December 13, 2010

Perfect Practice Makes Perfect: Overhaul Your Swim Technique This Winter

This week we're going to focus on swimming!  Yeah!!!

By Steve Tarpinian
Triathlete magazine
from active.com

The offseason is the best time to overhaul your swimming technique, but the challenge, particularly this time of year, is that drills and yardage without focus or with less-than-perfect technique are barely worth the effort and yield minimal results.

To refine your freestyle for the coming season, select a three-month period during your offseason downtime—ideally a block well out from a scheduled A-priority race—in which you can focus on tweaking technique rather than on big volume and high intensity.

Before starting your three-month swim-technique block (which will be broken down below into three, four-week microcycles), get a video of yourself in the pool to establish a baseline. This will also help you determine which aspects of your technique require greater attention.

For example, if upon analyzing your swim video you see you have a good body position but a short, ineffective pull, you may decide to rework the below schedule to spend more time on those areas in which you're relatively weak. Additionally, videotape your freestyle stroke after each of the following four-week blocks to monitor improvement.

Finally, performing a 500-meter/yard time trial once per month will also help you gauge your improvement.

Month 1: Body Position and Kick Focus

The more streamlined you can become, the more efficient your swimming will be: Think narrow and long. There are many variations of this drill, and my experience shows that the best results come from doing the following three variations in the order below.

Kick on side with no rotation
This is one of the best body-position drills. The objective here is to get comfortable kicking on your side with your bottom arm stretched forward, your ear on your shoulder and one goggle in and one out of the water. This is the ideal position for your head when you breathe. Use fins if you have trouble staying afloat.

Kick on side with one stroke
This drill targets body position and rotation. Perform the kick drill as above, but every five seconds take one stroke and switch from one side to the other. Focus on making a smooth rotation and keeping the body in alignment.
To accomplish this, begin the recovery with your trailing arm, and stay on your side until your hand passes your face, then start to bend the elbow of your leading arm. As the recovering arm enters the water, pull with the leading arm and roll to your other side. Keep your neck in alignment with your spine (don't lift your head) throughout.

Kick on side with three strokes
This drill is the same as the previous drill; however, instead of just one stroke, take three strokes as you rotate from side to side. Drive each rotation with your kick and hips, not your head or shoulders.
I suggest you spend four weeks perfecting these drills by integrating a drill set into every swim workout. For example:
  1. Warm-up: 500 meters/yards
  2. 4 x 50 meters/yards of each kick-on-side drill. Take 15 seconds' rest after each 50 and focus on doing the drill properly
  3. Main set
  4. Cool-down: 300-500 meters/yards

Month 2: The Pull

There are five basic components to the pull cycle: entry/extension, elbow bend (catch), pull, release and recovery. Analyzing your video will show you which parts of the cycle you need to focus on improving. My experience suggests that, most often, pull shortcomings arise when swimmers do not start the pull with a bent elbow, which allows them to catch and hold water.

The Key Drills

Fist drill
This drill is easy to perform: simply swim regular freestyle with closed fists, which will force you to bend your elbow to catch water with your forearms. Be conscious of feeling the water pressure on your forearms as you begin your pull. Swim half a length with closed fists, then open your hands.
The dynamic feeling of opening your hands and feeling the added power from the higher elbow is the positive feedback that makes the change carry over to your regular stroke. Since you actually need to struggle through the water a bit to feel this pressure on the forearm, it's best to do this drill without fins. This is the only drill whose effectiveness isn't enhanced by the use of fins.

Single-arm drill
Swim freestyle but only pull with one arm, keeping the non-working arm either stretched out in front or at your side. Perform this drill in sequences of two lengths, alternating arms with each length. Focus on your elbow bend at the beginning of the pull and on body rotation.
Spend four weeks perfecting these drills by integrating a drill set into each swim workout. Suggested workout:
  1. Warm-up: 500 meters/yards
  2. 8 x 50 meters/yards of fist and single-arm drills. Take 15 seconds after each 50 to re-focus on doing the drill properly
  3. Main set
  4. Cool-down: 300-500 meters/yards

Month 3: Integration

Here's where you start to pull it all together. The main drill here is an old favorite of many coaches and swimmers: the catch-up drill.

Catch-up drill
Begin in a streamlined position with both arms extended straight forward, then pull with one arm, leaving the other arm extended in front until you have finished a complete stroke with the working arm. The catch-up drill can help you develop a longer stroke and body position, which will increase your efficiency.
When first doing this drill, it's helpful to keep both arms in front of your head and kick for a few seconds before switching arms. This gives you time to visualize a proper pull with early elbow bending and good rotation during the power phase. If you see your pull is very short when you analyze your video, scrape your thumb on your thigh at the end of your pull during the drill.
Suggested workout:
  1. Warm-up: 500 meters/yards
  2. 10 x 50 meters/yards catch-up drill. Take 15 seconds after each 50 to re-focus on doing the drill properly
  3. Main set: Start to add long sets to build endurance. An example is 3 x 500 descending
  4. Cool-down: 300-500 meters/yards
There you have it! Take the journey and break out with a faster and more efficient swim next season.

Sunday, December 12, 2010

What Runners Should Know About Protein

By Karla Bruning
Examiner


Every runner knows they need carbs, but protein is just as crucial to muscle recovery after a workout. It repairs muscle damage, diminishes the effects of cortisol—the so-called “stress” hormone that breaks down muscle—and, when taken with carbohydrates, speeds your body’s ability to replenish its glycogen stores, your all-important energy source for those long runs during marathon season. If you’ve ever "hit the wall" or "bonked" in a marathon, you know what it feels like to deplete your glycogen reserves.

The 30/30 Rule

To gain the full benefits of protein’s power, most sports dieticians and nutritionists recommend getting 10-20 grams of protein within 30 minutes of finishing a run, and some say even sooner—that’s when your muscles are the most receptive to a helping hand.
The amount of protein you eat matters; 10 grams is a baseline and 20 grams is optimal, according to Deborah Shulman, who holds a doctorate in physiology. Much more protein than that won’t do you any good. A 2009 study published in the Journal of the American Dietetic Association found that consuming more than 30 grams of protein in a single sitting didn’t help muscles any further than more moderate amounts. Call it the 30/30 Rule: eat less than 30 grams of protein in less than 30 minutes post-run.

Healthy Protein

What kind of protein is best? The folks at the Harvard School of Public Health recommend fish, poultry and beans. Sure, a big juicy steak will do the trick, but it comes with a price: loads of saturated fat. A 3-ounce serving of salmon (about the size of a deck of cards or a woman’s palm) gives you 17 grams of protein and only 2 grams of saturated fat. Beans do fish one better: a cup of cooked lentils has 18 grams of protein and less than 1 gram of fat.

Don’t have the time or inclination to cook up a meal? Many athletes fuel post-run with a smoothie or protein shake. Just be sure to watch those protein amounts—some shakes carry a wallop. According to dietician Matthew Kadey, excess protein, like excess everything else, can be converted into fat.

Carb-to-Protein Ratio

Be sure to hydrate and eat plenty of carbs too. Remember, carbs and protein work together to replenish your glycogen stores more efficiently. The jury is still out on the ideal ratio of carbs to protein, but most sports nutritionists say to aim for a 3:1 or 4:1 ratio for your post-run meal, especially when you’ve run for an hour or longer.

Here’s a handy formula from Running Times magazine to figure out how many carbs you should be eating at mealtime: divide your weight in half. That’s your magic carb number. You can extrapolate your protein intake from there by dividing that number by three or four.

For a 125-pound runner:
63 grams of carbs, 21 grams of protein in a 3:1 ratio
63 grams of carbs, 16 grams of protein in a 4:1 ratio
And when in doubt, just remember the 30/30 Rule: eat less than 30 grams of protein in less than 30 minutes after a run.

NY Running Examiner Karla Bruning is an award-winning journalist whose work has appeared in dozens of publications.

Examiner.com is the inside source for everything local.  Powered by Examiners, the largest pool of knowledgeable and passionate contributors in the world, we provide unique and original content to enhance life in your local city wherever that may be.

Saturday, December 11, 2010

A Nutrition Primer for the Day Before the Big Race...

WHAT CAN NUTRITION DO FOR YOU NOW????


Night before the race:
*Choose higher carbohydrate foods. Typically, endurance athletes choose pasta but this could also include rice, potatoes, breads...OK to include moderate, low-fat protein.
*Avoid taking on the challenge of all-you-can eat pasta party
*Drink plenty of fluids (stick with non-caffeinated, non-alcoholic beverages!)
*If you tend to have a sensitive GI tract, avoid salads

Morning of the race:
*Choose something that you've had a chance to test out during your training and you know that you'll be able to tolerate while running/walking
*As a rule, stick to lower fat, higher carbohydrate foods... but watch those foods high in fiber (For me, this means a Power Bar, toast, or banana vs. the Grand Slam breakfast at Denny's)
*Hydrate: 8-16oz about 2 hours before the race.
4-8 oz. immediately before the start
(Some people may be sensitive to the sugar in sports and drinking them right before the race may leave them feeling hypoglycemic at the start. Unless you've tried drinking sports drinks before your training sessions, it may be best to stick to water at this point)

During the race:
*Hydrate: Drink 4-8 oz every 15-20 minutes
DO include sports drinks as part of your hydrating regime. You may want to dilute them by grabbing 1 cup of sports drink and 1 cup of water at each water station.
*Carbohydrates: Try to consume 100-300 calories/hour (or 60-90g carbohydrate/hour), ie, 1 packet of PowerGel or GU/hour or 4-6 cups Gatorade/hour (or a combination of gels and sports drink)
*Watch out for Gels and drinks that you've not tried before! If possible, it's best to stick with what you know!

After the race:
*Consume carbohydrates within the first 20 minutes after the race (ie, fruits, juices, bagels, yogurt)
*As little as 6g protein consumed within 30 minutes of finishing will help stimulate muscle repair and synthesis (This is equivalent to the amount of protein in a carton of yogurt or a sports bar)
*Hydrate: You will need to drink 2 cups fluid/pound body weight that you lost during the event. It may take as long as 24-48 hours for you to rehydrate completely. Choose high carbohydrate drinks such as juices and sports drinks to help replenish your glycogen stores and electrolytes at the same time.
*Treat yourself to a NICE meal after you've had a chance to shower up and rest! Include plenty of complex carbs as well as some protein!

Thursday, December 9, 2010

How to Avoid Eating When You're Bored

Another action plan... I've made some comments in orange.


Are you really hungry? Or just bored? At times, we eat because we have nothing better to do. It's something a lot of us do without thinking. Here are a few tips to help you establish a new routine and new habits:
  1. Make a hunger diary. Record your daily intake. Include a list of calories, if desired. [This is really good, but hard to maintain doing it]
  2. Recognize patterns of eating. Do they coincide with boredom? Is there a time of day when you are more likely to be bored.
  3. Identify if you are actually hungry. Ask yourself, on a scale of one to ten, how hungry you feel. If the answer is seven or more, you should probably eat something. Otherwise, refrain from eating until you reach this point of actual hunger.  [If you CAN refrain!]
  4. Satisfy feelings with other interests. Find other interests that are just as rewarding. Have fun with a friend[YES!]
  5. Make an activity hat. Fill the hat with different activities and pull one out to do. This should relieve your boredom and the urge to eat.  [Hmmm...mine would say "Clean the bathroom", "Do some laundry", "Cut the dog's toenails", and other exciting stuff like that.]
  6. Find an activity that occupies your hands. Try a manicure, needlework, typing or if you do play an instrument this is a good time for practising. You can only do one activity at a time.
  7. Concentrate on what you are doing. Force yourself to become preoccupied until the hunger subsides.
  8. Go for a walk. This will take you away from the kitchen. Once your scene has changed, your cravings should subside.
  9. Avoid buying certain foods. Identify the foods that you most commonly reach for and avoid having them in your home. [OMG, for me, this is chocolate, ice cream, flavored nuts, dried fruit, the list goes on and on!]
  10. Avoid having food in your bedroom. Eat only at the dining room table. Stashed snacks can be a big temptation.
  11. Choose nutritious food. Choose replenishing whole foods. Processed foods are deprived of natural vitamins and nutrients. [Good idea, if you must snack, eat carrot sticks!]
  12. Schedule a small nutritious snack between meals. This may keep you from indulging at meals.  [This is SO TRUE!  This really helps me.  And then I'm not allowed to snack beyond that.]
  13. Eat celery or watermelon. They are mostly water, low in calories and can quench your thirst. You may burn as many calories as the celery contains just by chewing it. The sweetness of watermelon is very satisfying. They're both pretty healthy.
  14. Drink a glass of water. Water is filling and may satisfy you for a period of time.  [NOT!]
  15. Never Eat Artificial Sweetener. They are no better for you than sugar and actually increase cravings.
  16. Chew a piece of gum. It's refreshing and low in calories. It may help to curb your appetite and actually burn a few calories.
http://www.wikihow.com/Avoid-Eating-When-You%27re-Bored